Felt Animal Masks for Kids

Lately, I have a new obsession with felt masks for kids. It all started when a friend asked me if I could help her with her baby’s Halloween costume. She was dressing her baby as a bald eagle. (Get it? Because she’s bald.) I helped by creating a mask out of felt that the baby would wear more like a headband. I don’t want to post a picture of my friend’s baby without her permission, so you’ll just have to trust me, it was adorable!

And as things can go for me, I quickly became obsessed with the idea of creating felt masks for kids, and the Internet has so many ideas to share with me!

My niece and nephew live abroad, and typically when I want to buy them presents, I shop through Amazon because, at the end of the day, the shipping is cheaper. But I think what spurred my obsession was the thought: Felt masks are going weigh nothing! They are going to be so cheap to ship overseas!

IMG_8413.JPG

So one Saturday, I sat down and created six felt masks—three for both my niece and nephew. For the most part, I found some sort of inspiration online and then freehanded the whole thing. The blue bird was my most abstract mask, but it turned out to be my favorite.

IMG_8414.JPG

Sure enough, once wrapped and packages in a mail bag, the total weight was less than a pound. It was the cheapest present I’ve ever sent to Europe. My intention was to send them as Christmas presents, but one day in mid-December, I got a text from my sister-in-law with a few pictures and the caption, “I’m so sorry, but we just couldn’t wait!”

IMG_8645.JPGIMG_8644.JPG

I may just have a new business venture in the making!

Felt Daily Activity Schedule

IMG_3145

This visual activity schedule for kids was a custom order for a friend of a friend, and looking back over these images, I realize that the person who purchased this got quite the deal. (Aka I charged way too little… which is the story of my business life.)

I am beyond proud of this project. I love how it’s colorful. I love that it’s made out a felt. And I love that I took the extra time to make this banner sturdy—with the hopes that it not only survive one child but could possibly be passed down for the use of a second or a third.

img_2833

The idea was provided by the customer. Her son thrived under a routine, and she found that their days progressed better when he understood, to a point, what to expect. She provided the individual prompts—signs for lunch, playtime, bedtime, snack, etc. We made sure there were enough signs to make it through the hours of the days, plus extras… because obviously, you need some variation within the week.

She asked for the day to start at 7 and end at 7, and then I came up with the rest from there. The trick was trying to figure out how to visualize 13 hours on a banner without making it enormous. Though the problem quickly resolved itself when I realized I would need to create some sort of pocket to store the little signs. I created two columns with seven panels each.

img_3096

Before finishing the banner—using quilting techniques like binding—I attached magnet snaps to the banner along with the signs. Since felt is a soft fabric, I worried that the act of pulling the signs off the banner each day would quickly wear on the fabric, so I made sure each magnet had a backing of thick cardboard.

IMG_3162

I designed the banner so it could be hung on the wall and easily used by a child. Plus, I just wanted it to look good. Knowing it was for a boy, I used lots of blues and greens. But you could easily use different color palettes, like purple and blue, yellow and navy, pink and more pink!

IMG_3155

All of the signs were hand sewn, but I did use a sewing machine for the banner.

… Yeah, I definitely should have sold this for four times the price I charged. Oh well.

IMG_3157

Take Heart, I made you a pillow

IMG_3583

With Valentine’s Day right around the corner, I decided to make a few heart-inspired gifts for you love bugs. But let’s face it, I don’t need a holiday to embrace my adoration for hearts. I’m probably going to use the pillow all-year-round.

IMG_3595
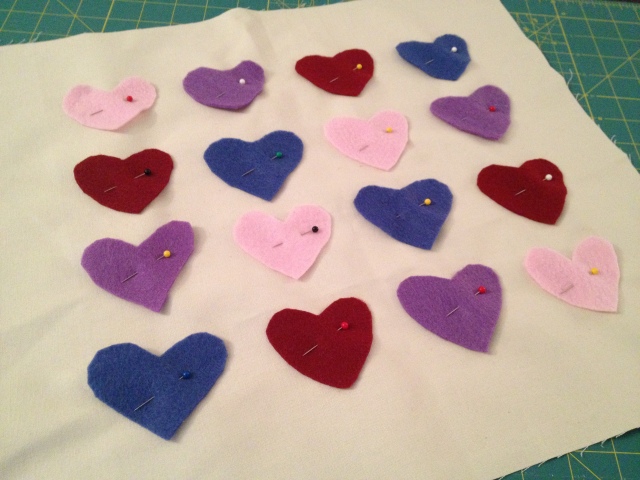
Felt is the best fabric for this type of project because it does not fray. I cut the hearts out using the method my elementary school teacher used to teach me about symmetry, and I simply used the first heart as a template for the rest.

DSC_0499
Once pinned in place, I used my sewing machine to stitch the hearts in place. If you have a embroidery foot for your machine, it would be great for this project. I just used the standard foot. Even though my lines are a little “zig zag,” I like the look. (It’s the imperfectness that makes you know it’s homemade.)

DSC_0501
I love a pillow with piping, but for this pillow, I felt like it needed a little ruffle. So after sewing the pillow together (right side together), I flipped the pillow (rights sides out) and ironed it. I then stitched a half-inch border, leaving the same size hole for stuffing the pillow. Next, I stuffed the pillow using a polyfill pillow stuffing, and used my sewing machine to close the hole of the inside border stitch. I used a blind stitch the close up the outside.

DSC_0498
It took me a little over an hour to put this pillow together. And now it’s on sale over at the Etsy shop.