Felt Animal Masks for Kids

Lately, I have a new obsession with felt masks for kids. It all started when a friend asked me if I could help her with her baby’s Halloween costume. She was dressing her baby as a bald eagle. (Get it? Because she’s bald.) I helped by creating a mask out of felt that the baby would wear more like a headband. I don’t want to post a picture of my friend’s baby without her permission, so you’ll just have to trust me, it was adorable!

And as things can go for me, I quickly became obsessed with the idea of creating felt masks for kids, and the Internet has so many ideas to share with me!

My niece and nephew live abroad, and typically when I want to buy them presents, I shop through Amazon because, at the end of the day, the shipping is cheaper. But I think what spurred my obsession was the thought: Felt masks are going weigh nothing! They are going to be so cheap to ship overseas!

IMG_8413.JPG

So one Saturday, I sat down and created six felt masks—three for both my niece and nephew. For the most part, I found some sort of inspiration online and then freehanded the whole thing. The blue bird was my most abstract mask, but it turned out to be my favorite.

IMG_8414.JPG

Sure enough, once wrapped and packages in a mail bag, the total weight was less than a pound. It was the cheapest present I’ve ever sent to Europe. My intention was to send them as Christmas presents, but one day in mid-December, I got a text from my sister-in-law with a few pictures and the caption, “I’m so sorry, but we just couldn’t wait!”

IMG_8645.JPGIMG_8644.JPG

I may just have a new business venture in the making!

Advertisement

Felt Daily Activity Schedule

IMG_3145

This visual activity schedule for kids was a custom order for a friend of a friend, and looking back over these images, I realize that the person who purchased this got quite the deal. (Aka I charged way too little… which is the story of my business life.)

I am beyond proud of this project. I love how it’s colorful. I love that it’s made out a felt. And I love that I took the extra time to make this banner sturdy—with the hopes that it not only survive one child but could possibly be passed down for the use of a second or a third.

img_2833

The idea was provided by the customer. Her son thrived under a routine, and she found that their days progressed better when he understood, to a point, what to expect. She provided the individual prompts—signs for lunch, playtime, bedtime, snack, etc. We made sure there were enough signs to make it through the hours of the days, plus extras… because obviously, you need some variation within the week.

She asked for the day to start at 7 and end at 7, and then I came up with the rest from there. The trick was trying to figure out how to visualize 13 hours on a banner without making it enormous. Though the problem quickly resolved itself when I realized I would need to create some sort of pocket to store the little signs. I created two columns with seven panels each.

img_3096

Before finishing the banner—using quilting techniques like binding—I attached magnet snaps to the banner along with the signs. Since felt is a soft fabric, I worried that the act of pulling the signs off the banner each day would quickly wear on the fabric, so I made sure each magnet had a backing of thick cardboard.

IMG_3162

I designed the banner so it could be hung on the wall and easily used by a child. Plus, I just wanted it to look good. Knowing it was for a boy, I used lots of blues and greens. But you could easily use different color palettes, like purple and blue, yellow and navy, pink and more pink!

IMG_3155

All of the signs were hand sewn, but I did use a sewing machine for the banner.

… Yeah, I definitely should have sold this for four times the price I charged. Oh well.

IMG_3157

Cookie Monster ‘Trunk or Treat’

Earlier this year, my mom accepted a position as a director of children’s ministries at a church near their house. With Halloween approaching, she began planning her first-ever Trunk or Treat event. And since Mom was in charge—and Dad and I are people who don’t like to be outdone—we brought our A-game by creating a monster-sized idea.

We used his truck to create a larger-than-life Cookie Monster display. (And I’ll go ahead and spoil the ending for you, we took home the top prize!)

IMG_8365.JPG

I love creating projects with my Dad because he always brings out the power tools. We started the display by creating the wood frame. His truck bed had two notches along the top that could fit the legs of our frame, helping it stand up. (I’m not sure what the technical name or use of these notches are. Sorry, I’m not a car person.)
IMG_8343IMG_8345


IMG_8348.JPG

Once the frame was complete, we wrapped it with cheap blue fabric we found at Walmart. (The key to creating Cookie Monster is all about finding the right color blue.) We ended up letting the blue fabric hang low to cover up more of the truck.

Note: I love the picture below because it shows how exacting my dad is. We couldn’t just cut out a circle. We had to use an Xacto knife.

IMG_8352.JPG

I used black fabric (the same cheap fabric as the blue) to cut out a mouth, and we used poster boards to create the eyes. We decided to not attached the eyes until we actually got to the event because we thought there was a high risk they could be damaged in the drive to the church. But I attached the black fabric mouth with spray fabric adhesive.

IMG_8355.JPG

With the display complete, the next step was to create the corresponding game. In the church’s storage room, my dad found a wooden bean bag toss board. He brought it home and covered it with blue felt. I create a similar black mouth out of fabric, and we created another pair of the eyes.

Finally, I made felt cookies as the bags kids would toss into Cookie Monster’s mouth. At the local Walmart, we found 1-pound bags of beans, and I stuffed the felt cookies with the bags as-is. (Aka I didn’t open the plastic, keeping it as the container for the beans.)

IMG_8357.JPG

IMG_8368.JPG
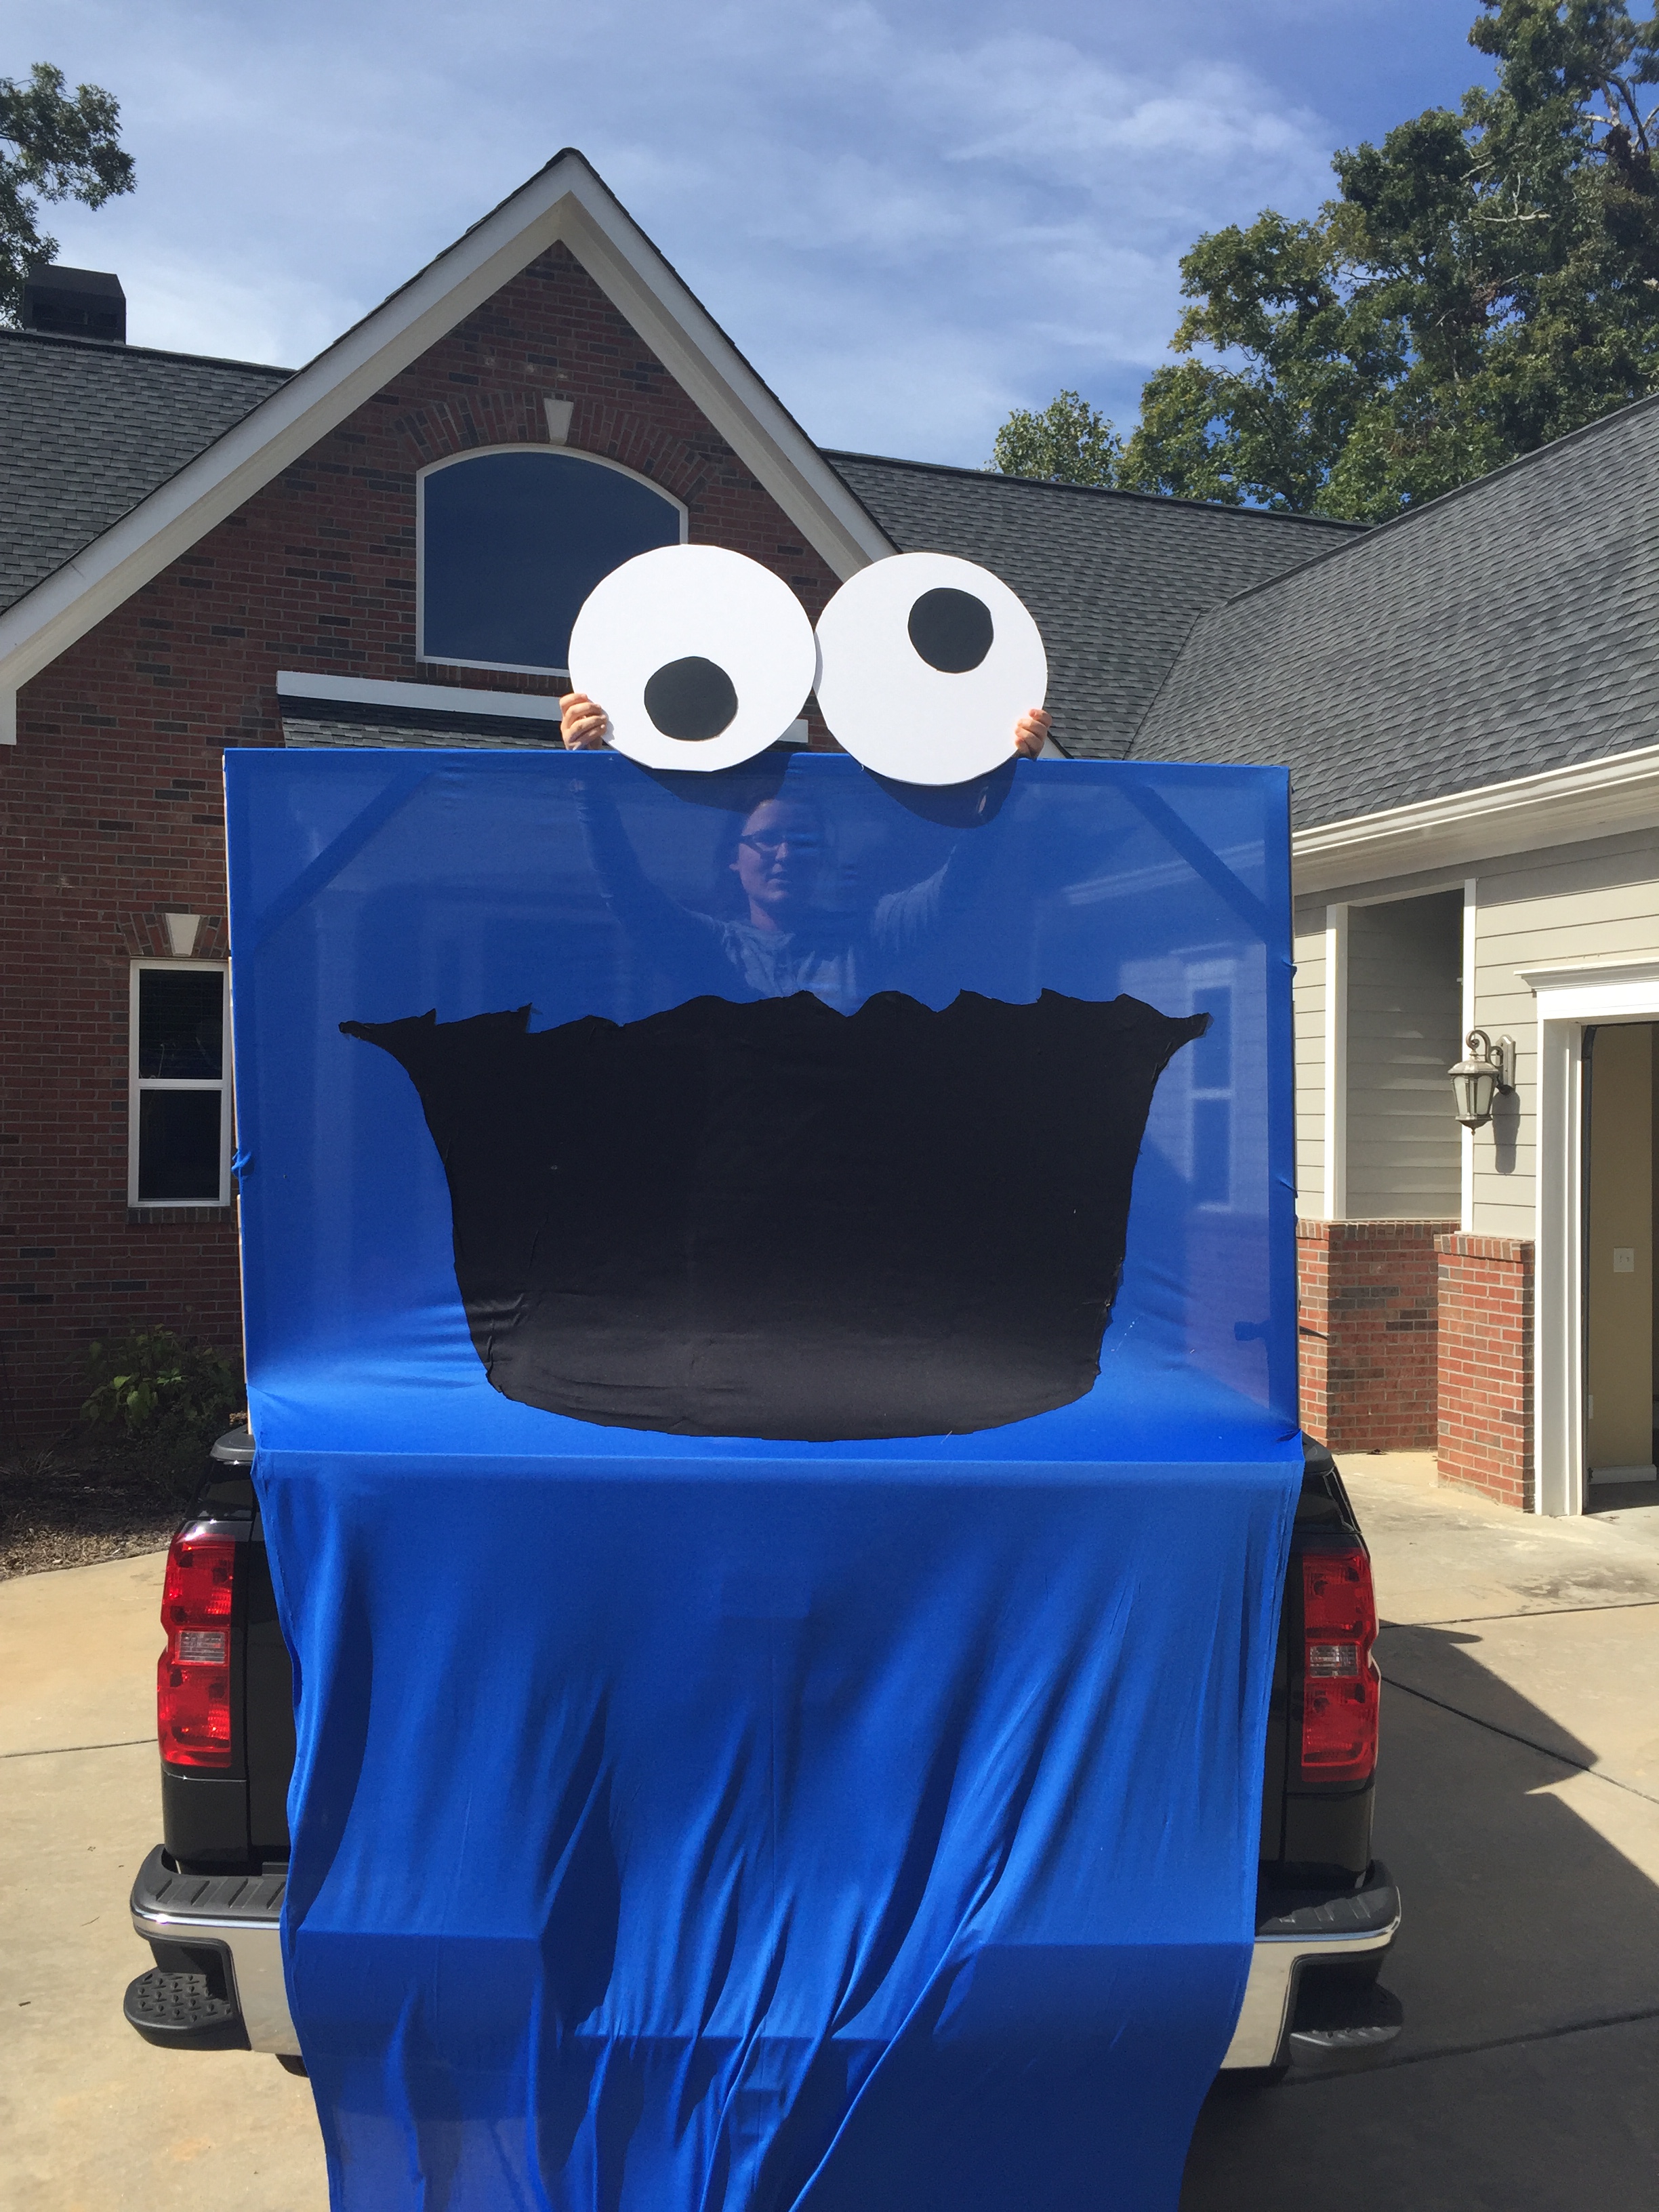
Like I said at the top of the blog post, there was a contest for the best display at the Truck or Treat. We won!

Felt Christmas Stockings

It’s been a year and a half since I logged into this WordPress site, and this great hiatus is not because I’ve stopped crafting. Goodness, no. But instead, I let this project that once brought me tremendous joy sail away with other seasonal life interests. I could blame the busyness of work or that I’m now taking graduate classes at night. But in truth, I think the joy that led me to create this blog began to fade a year and a half ago, making a fun side hobby feel more like work.

Well, as some people say, never throw anything away because its bound to come back in style.

Over the Christmas break, I was inspired to read through the countless blog posts I have here. Of course, it’s a little embarrassing to see how many spelling and grammatical errors exist (and I’m sure there are a few in this post too), but the walk down memory lane was fun. At the same time, I was creating felt stocking for my parents, using patterns/kits by Bucilla.

IMG_8661.JPG

Christmas was a little different this year for my family. My mother was recently diagnosed with cancer, and two weeks before Christmas, she underwent a very intensive surgery that caused an extended hospital stay. My parents live in Georgia; I live in Alabama. So for several weeks, I made the trip back and forth.

As I’ve said on this blog before, my mother has the best advice, and her crème de la crème is this: Know what makes you happy, so when times turn sad, you have tools you can use to lift yourself up.

My greatest tool is crafting and sewing… and a whole of prayer. I can’t remember when the idea came to me, but I know this project of creating felt stockings was one of the greatest blessings during this difficult time.

IMG_8671.jpg

Not only did the kits throughly entertain me during a time where there was a lot of sitting around, but they able gave me a focused line of thought on something positive and beautiful.

I finished my dad’s stocking before the surgery, and I worked on my mom’s throughout her recovery in the hospital. Once it was finished, I was able to hang it on her wall, adding a bit of Christmas decoration to her small hospital room.

And I will note: the kits were amazing portable. I utilized small jars to organize the beads and sequins, using a magnet on the underside of the lids to store the sewing needles. I was able to contain everything I needed in a single freezer zip lock bag, so no matter where I was—siting at my craft table, the floor of a waiting room, the chair in the hospital room, etc.—I was able to work on it.

IMG_8766.JPG

Mom ended up leaving the hospital on Christmas afternoon, and in the following days, we opened presents and tried our best to celebrate a normal holiday season. The new stockings for Mom and Dad hung on the mantle with the felt stockings Mom made for me and my brothers when we were born.

IMG_8803.JPG

I’ve been writing a lot about this season I just experienced, mainly in Word documents that one day may see the light of day. In doing so, I felt the joy that I once had for this blog rising back up with in. So here I am, back for reading pleasure. The good news is, I have a lot of content from the past year and a half that I can share with you. I hope you enjoy.

Woodland [Felt] Creature Mobile

img_2561

Felt and woodland creatures are a pretty adorable combo! I created this sweet baby mobile for friend preparing a nursery for her son. The theme: animals.

img_2556

I’m pretty proud of this project because I created the animals without templates. It took me a couple tries to get the right look, especially for the raccoon, but that’s why we sketch things out.

img_2559

Once I was happy with the sketches, I used them as a template to cut out the felt. Working with a front and back piece for each animal, I added details, sewed the pieces (right sides) together and used fiberfill to make them slightly plush.

IMG_2587

To create the mobile, I initially thought I would use an embroidery hoop for the structure. But then I found this piece of wood at JoAnn Fabrics, and I thought it really added to the “woodland” theme.

IMG_2593

I forgot the technical name of the hooks I used, but they screwed into the wood board really easily. I used twine to hang the animals. I even added a few felt leaves as an final  touch.

IMG_2594

Stages of the [Felt] Moon

FullSizeRender 5.jpg

Oftentimes, when an idea pops into my head, I question its originality. People say there’s no such things as an original idea anymore… right?

After finishing this project, I have seen so many references to the moon phases in others’ craft projects and art pieces. Original… maybe. But the truth is, we all influence each other.

To be fair, I have always had a love of space (as several posts on this blog can prove.)

FullSizeRender 4.jpg

After the idea came to me, it only took 30 minutes to complete this simple project. I had circle of wood that I mounted the felt to with Mod Podge, and I used tape to attached the circles on the string. (My 8th grade science teacher should be proud that I remembered the moon phases without having to reference the Internet.)

IMG_2569.JPG

Felt fruit for a berry bowl display

icm_fullxfull.68542278_k4vbx0dnyxsgo8g0k0kw

Oftentimes, people ask me, “What is the purpose of felt food? What do people do with it?” My answer is simple: I make felt food with the intention of it being toys for children and pretend play. But then occasionally, I’ll meet a customer who buys them for other reasons.

Recently, a customer told me they purchased my felt strawberries to help display her handcrafted “berry bowls” at craft fairs. I loved this idea, and I freaked out a little when she sent me this beautiful picture. You should check her out: Rebecca with Willow Avenue Pottery.

Woodlawn Street Market, Round 2

Love of Felt hit the streets once again at Woodlawn Street Market this spring. The market was a big success, thanks largely in part to my mother who drove over to Birmingham to spend the day with me.

IMG_5496

This time around, I actually made some investments. I purchased 6-foot long tables, table covers and baskets. I did some research online of other maker’s set ups. And I put some thought into where each item should be displayed. (Like one blog suggested placing your top selling items  closest to the aisle to better grab  the attention of a walker-by.)

I’m almost too embarrassed to post a link to my first market set up, but for the sake of learning from one’s mistakes, I’ll share. (Don’t judge too harshly.) I think it’s safe to say I’ve improved leaps and bounds at my second time at bat.

IMG_5497

Notes I made for next time:

  • Make a sign with the shop’s name to hang in the back. (This time around, I simply ran out of time. I wrote “Love of Felt” on one of my small chalk boards, but I think a bigger sign will make a huge difference.)
  • Use the back table to create a center of focus. Again, I think a sign will enhance this, but I may also purchase more crates to place on the back table to add different levels of height.

IMG_5498

Before this market, I spent a good amount of time seeking advice online. I really liked this post from Catshy Crafts. I took her advice about mocking up my display at home a few days before, and I’m so glad I did. It helped so much having a game plan going into the morning. Plus, it helped me realize details I was missing. I snapped a few pictures of the mock up to help me remember.

IMG_5490

Lettuce Turnip the Beet

IMG_5542

A friend recently gave me a card beautifully illustrated with a head of lettuce. It read, “Lettuce always be friends.” I laughed at this for an embarrassing amount of time. It then led to a Google search for “vegetable puns,” and my world was opened to the plethora of puns the world has to offer!

I then made this banner. My thought is that it can help decorate my display the next time Love of Felt goes to market. Who knows, I may even put it up for sale.

Come Visit Me at the Woodlawn Street Market

Screen shot 2015-04-08 at 11.25.40 AM

This week, I’m in full production mode as I prepare for the Woodlawn Street Market this Saturday. I’m bringing with me lots of felt food and hopefully (time depending) lots of felt cactuses and (brand new) felt succulents!! So if you’re in Birmingham this week, come by and visit. I would love to meet you and talk shop!