My Farm-to-Table Birthday Dinner Party

The word that best describes the night is magical, and it really, really was.

IMG_9542a

Last week, I turned 24, and to celebrate, I hosted a farm-to-table with a group of wonderful friends in my own backyard. It was the best birthday I’ve had in my adult life.

IMG_9556a

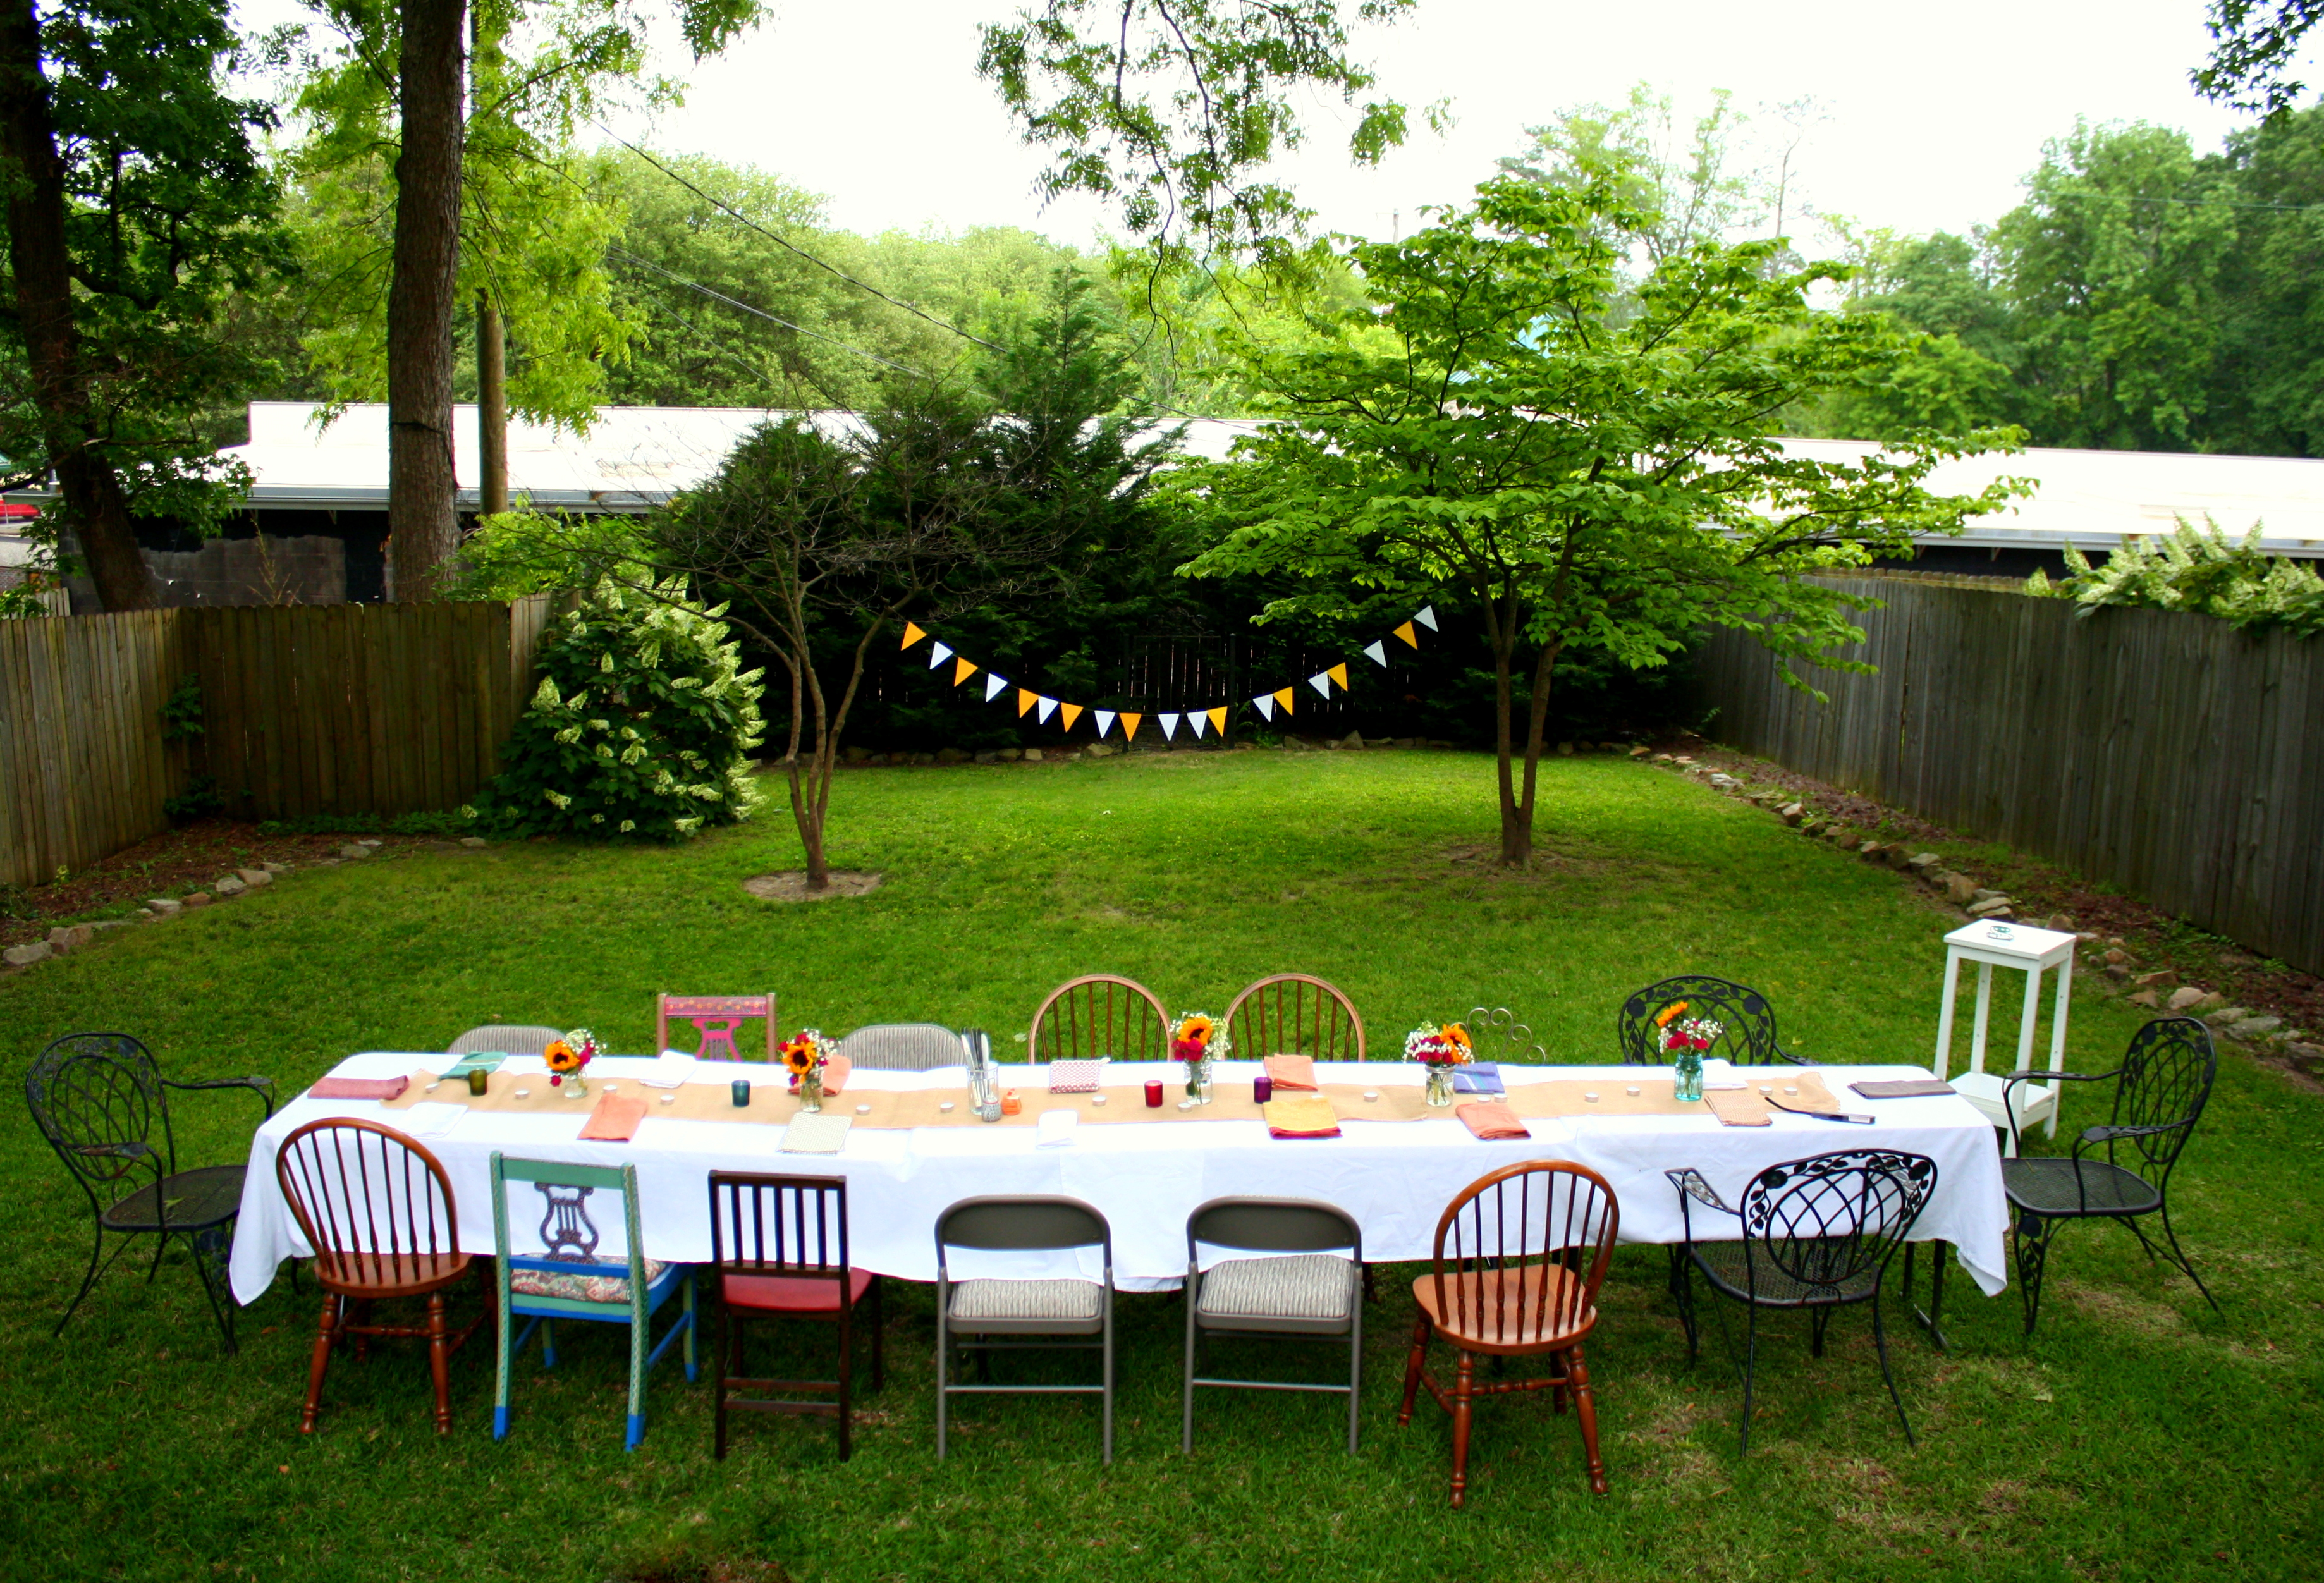
My roommate Elizabeth and I have been talking about hosting a farm-to-table dinner for weeks. To serve a meal sourced exclusively from local ingredients. And then when my birthday entered the horizon, we decided it was the perfect occasion to turn our idea into reality. With the tables I had purchased for the Woodlawn Street Market, we turned our backyard into the most magical place on earth.

IMG_9550

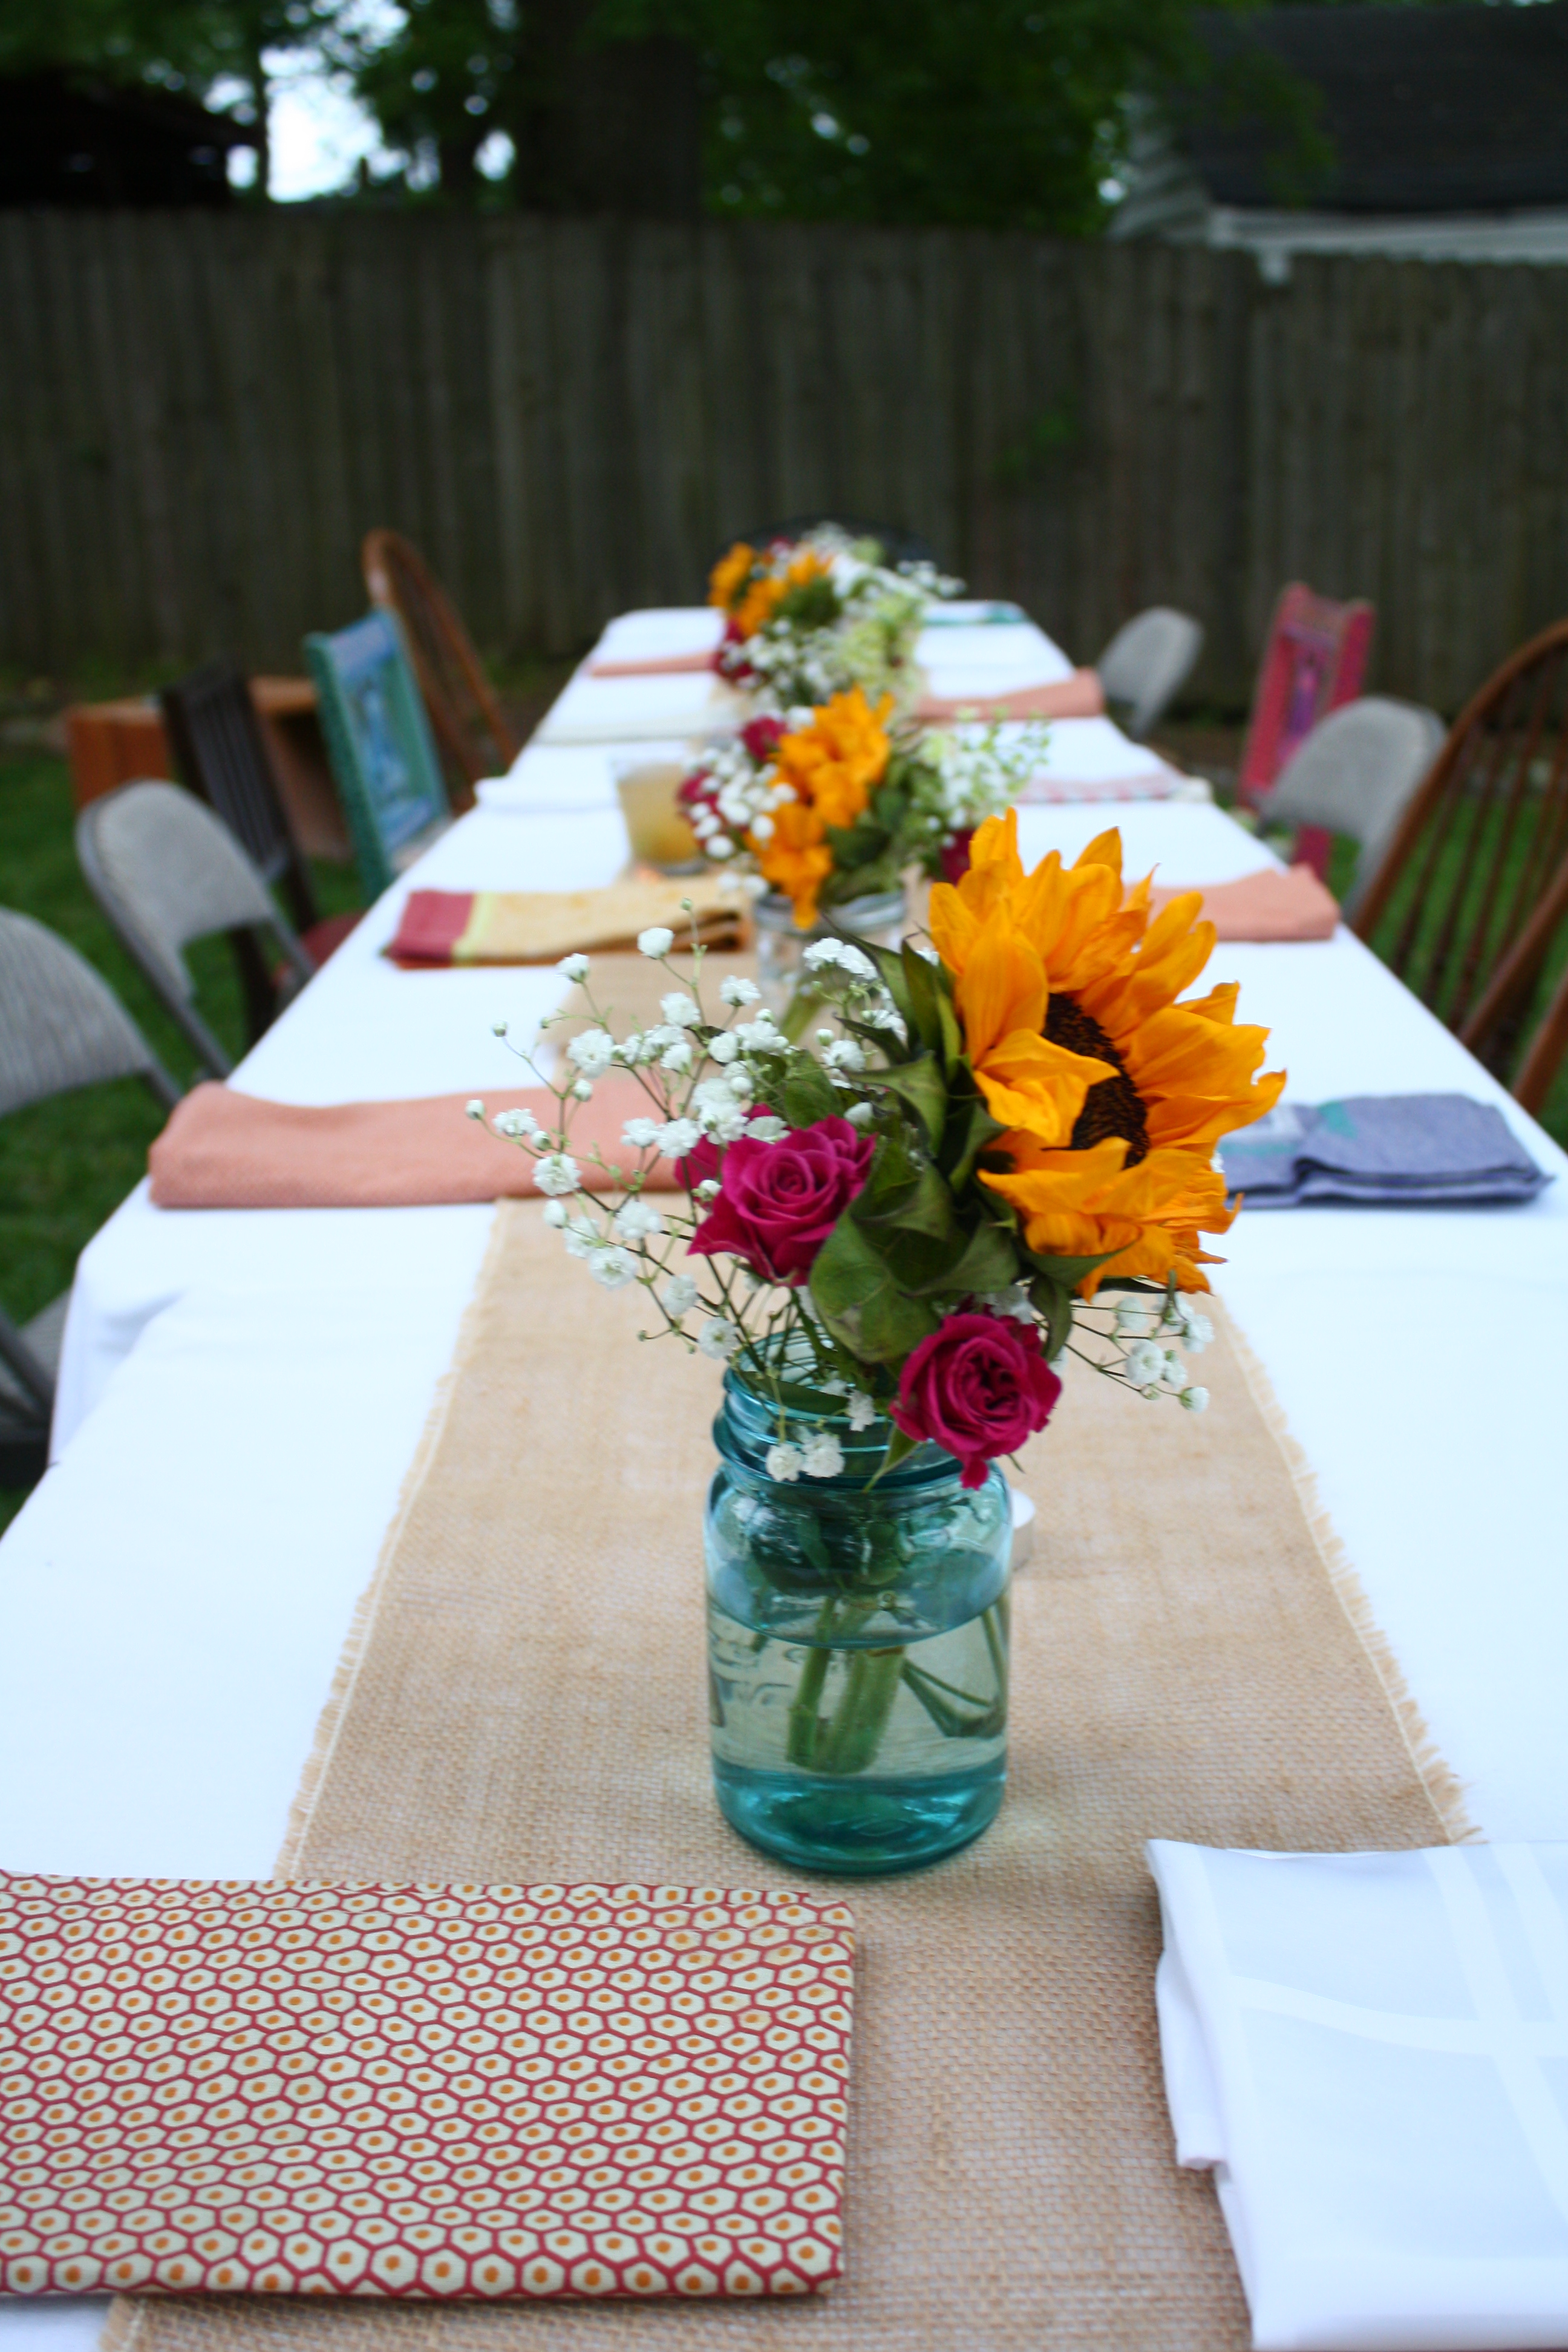
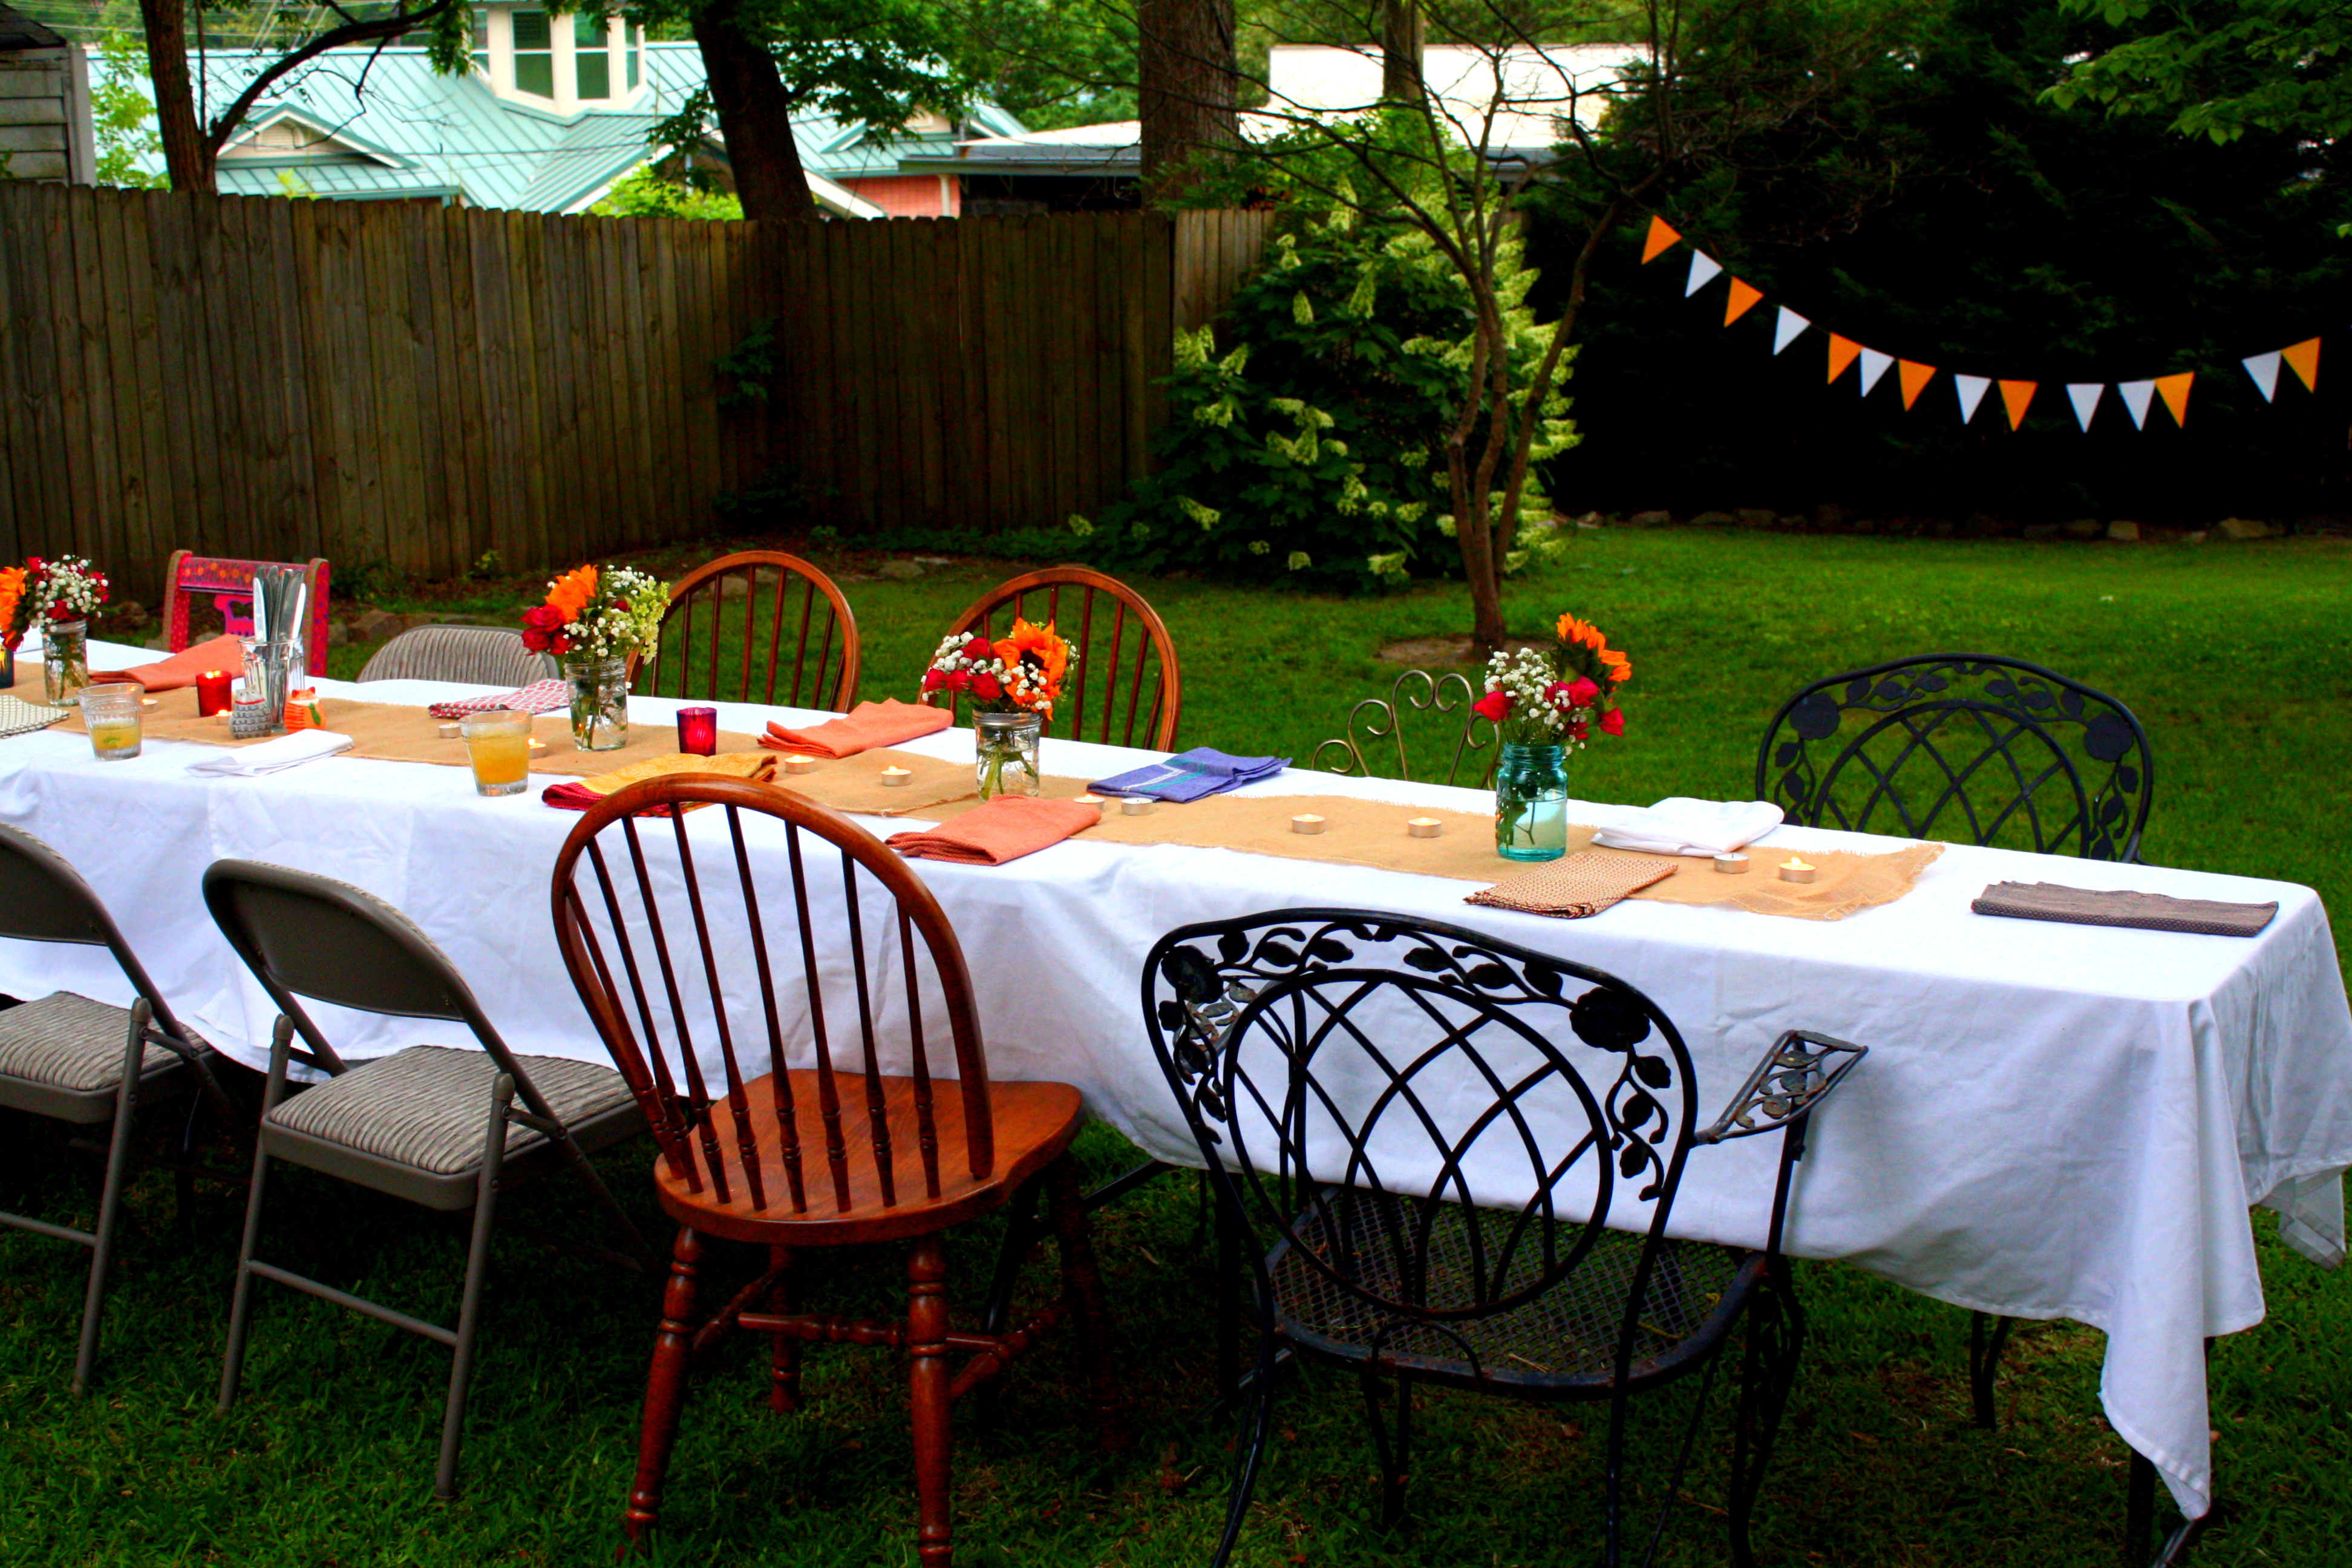
We kept the decorations simple and embraced a mixed-matched theme. I had purchased the white tablecloths for the street market, and the burlap table runners came from my grandmother’s 80th birthday party. I have an assortment of cloth napkins that I had purchased from prop sales at work. And we used every chair in our house (plus a few from Elizabeth’s mom).

My dear friend Stephanie arranged the flowers using jars I had lying around the house. I love how elegant the simple arrangements look, using only sunflowers, spray roses and baby’s breath.

IMG_9543a

I don’t know what this says about Elizabeth and I, but we had to borrow plates, knives and chairs to accommodate 16 people, yet we had more than enough wine glasses. We set out drinks and appetizers for when people arrived, keeping the main courses inside to avoid bugs. I made a yummy white wine sangria, my friend Leah brought rum to make Dark ‘n’ Stormys, and (since my mother always say you should have a yummy, nonalcoholic option) I had lemonade and cucumber-lemon water. And then several people brought a bottle of wine.

IMG_9566

As people arrived, we mingled on our back porch, and we have a nice stone patio at the base of the porch steps. To combat the bugs, we had tiki torches lit on the deck, and we set up a couple of these mosquito coils from Off. (We found ours at Target.) They worked great. Highly suggested.

IMG_9569a
The food – oh the food – was so crazy good! I prepared a bbq pork shoulder from Morning Song Farm in the slow cooker. Elizabeth made cheese grits with McEwen & Sons grits. We also enjoyed potato and green bean salad, yellow squash casserole, feta and artichoke tarts and so much more!

IMG_5634_2

We ate, drank and talked for hours. It was spectacular. And then we ended the meal with a personal favorite: Edgar’s strawberry cake. Perfection! I couldn’t have asked for a better night with wonderful weather, delicious food and amazing friends. I vote this becomes an annual tradition.

IMG_9581a

A huge thank you to Stephanie for taking these pictures throughout the night!

Advertisement

Woodlawn Street Market, Round 2

Love of Felt hit the streets once again at Woodlawn Street Market this spring. The market was a big success, thanks largely in part to my mother who drove over to Birmingham to spend the day with me.

IMG_5496

This time around, I actually made some investments. I purchased 6-foot long tables, table covers and baskets. I did some research online of other maker’s set ups. And I put some thought into where each item should be displayed. (Like one blog suggested placing your top selling items  closest to the aisle to better grab  the attention of a walker-by.)

I’m almost too embarrassed to post a link to my first market set up, but for the sake of learning from one’s mistakes, I’ll share. (Don’t judge too harshly.) I think it’s safe to say I’ve improved leaps and bounds at my second time at bat.

IMG_5497

Notes I made for next time:

  • Make a sign with the shop’s name to hang in the back. (This time around, I simply ran out of time. I wrote “Love of Felt” on one of my small chalk boards, but I think a bigger sign will make a huge difference.)
  • Use the back table to create a center of focus. Again, I think a sign will enhance this, but I may also purchase more crates to place on the back table to add different levels of height.

IMG_5498

Before this market, I spent a good amount of time seeking advice online. I really liked this post from Catshy Crafts. I took her advice about mocking up my display at home a few days before, and I’m so glad I did. It helped so much having a game plan going into the morning. Plus, it helped me realize details I was missing. I snapped a few pictures of the mock up to help me remember.

IMG_5490

Anthropologie-Inspired Felt Christmas Stocking

IMG_4921I know, I know. I’m writing about my Christmas stocking in the final days of January, but to my defense, this month has flown by. I’m ready to flip my calendar to February with hopeful thoughts that next month won’t be as crazy.

But back to Christmas: this year I decided I wanted to buy a nice Christmas stocking, one that I would treasure year after year. When I stumbled across this stocking at Anthropologie, I was instantly smitten, but the price tag made me think twice. The thought is almost reflexive at this point: I could totally make this!

IMG_4907I’ll keep the picture of the Anthopologie stocking small because when placed side-by-side, my stocking looks pretty “crafty” in comparison. The difference is in the quality. I’m sure Anthopologie used expensive wool. I used acrylic felt from Hobby Lobby. They used these adorable mini pom poms with a trendy color pallet. I was stuck with the primary colored trim selection at JoAnn Fabrics.

Don’t get me wrong, I love how my stocking turned out, especially when you compare the price. I spent about $8. The item is now out of stock, but I remember Anthropologie selling it for almost $50.

IMG_4916

In my excitement of the project (plus, I made it really late at night and the lighting would have been a mess), I didn’t take many step-by-step pictures. But the process doesn’t venture far from a normal Christmas stocking tutorial. After cutting out the main piece of the stocking, I simply attached rows of trim. And instead of using my sewing machine, I used a blanket stitch to hand sew the stocking together. I used light blue thread to provide a little contrast.

My final touch was the accent of purple and magenta yarn pom poms. I hunted for the white yarn in the similar style, but after going to a few stores, I felt lucky to have stumbled across the purple yarn. So I made it work!

I’m sure when Christmas comes around this year, I’ll go through the same thought process of wanting a buy nice stocking. But for now, I’m excited that this Christmas stocking is mine.

For the Love of Gold Paint Pens

IMG_5026

The latest craze to hit my life: the beauty of a gold paint pen. I took the pen from my parent’s house to work on a project for my Grandmother’s birthday, and I’ve been playing with it ever since.

This week, I was putting together little gifts for my co-workers, and the pen came out. (I gave a gift card for a free pop from Steel City Pops, and because that place is so clever, a gift card is a stamp Popsicle stick.) I love, love, love how these cards turned out!

IMG_5032

Woodlawn Street Market

I find that life gives you opportunities to jump into the deep end of the pool, and when those opportunities come, you just have to plug your nose and go for it. About a month ago, I signed up to participate in the Woodlawn Street Market, and whether I was ready for it or not, it was time to see how well my felt goods could sell outside of Etsy.

The day turned out to be a success. Though the market was pretty small (it had about 25 vendors), I was happy to make a  handful of sales and walk away with a little over $100 in profits.

Somethings are best learned through experience, and when it comes to being a vendor, I think this statement holds true. But for those of you who are looking to try a craft fair or street market for the first time, here are the lessons I learned from my first experience.

IMG_4733

Lesson #1: How much inventory should I bring?

A week before the market, I felt completely unprepared. So I created a long to-do list for myself and spent every spare second (included lunch breaks and normal sleeping hours) cutting out and sewing together my felt creations. I decided to sell 12 different items. For the best sellers (lunch sets, breakfast sets and Pop Tarts), I create 10 to 15 of each. For others, quantities varied from 5 to 10 items each. By the time Saturday rolled around, I had a lot of stuff, but I still felt like it wasn’t enough.

It was only until I started to set up that I realized I had a ton of stuff! I couldn’t even fit everything on the table. I knew the market was going to be small, but I brought enough inventory that if I sold out, I could make $800. It was a little overkill. I would have done fine if I had brought half of what I actually did. But, on the flip side, it was nice to feel prepared, and I have plenty of inventory left for Etsy orders or possible another craft market before Christmas.

IMG_4725-0

Lesson #2: How should I  best display my items?

Next time, I’m going to use more tables. I was given a lot of space (a 12 x12 booth), and I should have taken advantage of it. (Plus, I should have centered my table cloth. Looking at the picture now, I realize how silly it looks.) A friend gave me the advice that a clustered look attracts customers, but I think I had too much stuff on top of each other.

I did use display pieces, which turned out to be a great sale technique. These items are meant to be touched and played with, so I wanted people to pick them up, examine them (and then fall in love with them, of course). The kids that came by totally got it. Before their parents could make it to the table, they were waving around the bag of chips like it was the coolest things they’ve ever seen. They dove their little hands into the bowls of felt salad and pasta before anyone could stop them. Kids know toys when they see them.

IMG_4726-0

IMG_4727-0

Lesson #3: How much should each item cost?

This is an question I am still asking. Someone told me a story once. They had a friend who wanted to go into the photography business but didn’t know how much to charge for his services. He researched what other photographers were doing in the area and picked a middle of the road price point. He barely booked any sessions. Then he decided to find the highest price out there and top it, and his business took off from there. He said that because he had the highest price point, people assumed he was the best. He was the best that money could buy.

Though I do not think I could start selling my felt items for hundreds of dollars, the story proved to me that we cannot always guess what the consumer is thinking. I would think that at a middle-road, affordable price, my felt breakfast sets would sell like crazy! But alas, I only sold 3 sets this weekend.

The issue I find with pricing homemade items is how to you quantify the amount of time you send to create it. If I priced the felt lunch set to reflect the amount of time it took me to create it, I would need to sell it for at least $50. But why would you pay $50 for my homemade item when Target has shelves of more inexpensive, yet equally adorable items. So I’ve decided to use prices that do not account my time, but instead build in room for a small profit with the price of the materials.

Maybe over time, if items become more popular, I’ll increase prices. But for now, I like how my prices are affordable. I rather my felt food be in the hands of children that stored in the back my closet!

Embroidery on a Snow Day in Alabama

When I walked into my apartment after a rather insane day of snow and ice in Alabama, I put on comfortable clothes, made some tea and pulled out the embroidery floss. My snow day was going to be a relaxing one.

DSC_0543

“Come Thou Fount” might be my favorite song of all time. After finding this fabric amongst my scraps, this verse instantly came to mind.

DSC_0550

Since I used a smaller hoop (only 6 inches in diameter), I have to use smaller text to make it all fit. I made “Hello Friend” a couple of months ago and decided to mimic its font for this hoop.

DSC_0551

The finish touch to all this is a piece of felt to cover the back. I added the heart just because I wanted to, but I’m thinking it might be a nice signature touch for all of my future projects. Maybe it could turn into some sort of logo.

DSC_0545

What’s in a Name: Creating my Etsy shop

As this blog approaches its third birthday (celebration soon to come), I figured it was about to time to expand – enter Etsy from stage left.

Screen Shot 2013-12-02 at 7.21.22 PM

This Etsy shop has been a long time coming. People kept asking me why I didn’t sell the items I made. And the fact is, I’m not very good at production. Crafting is no longer fun for me when I feel like I have to do it. Once I make something, I want to move on to the next, new and exciting thing!

So I created a shop that works for me. I want my shop to be an extension of this blog – hence the shared name. I’ll keep posting projects and tutorials here, hopefully providing you the inspiration to create wonderful things. But for those who love the idea but don’t have the time to make it themselves, they can now skip the steps and buy the final product by clicking the link at the end of the post.

The shop has been open for about a month now, and I know I still have so much to learn about Etsy. It’s a big marketplace, and I’ll admit, I haven’t found my niche. But this is what I have learned so far and am still trying to figure out.

(1) Amazon has taught us to expect free shipping. 

Now Etsy doesn’t tell you this, but I realized it after spending quite a bit of time shopping on Etsy myself. For my mom’s birthday, I found this amazing pie plate for a reasonable price, but I didn’t buy it because shipping was going to cost an additional $20. It takes away the confidence of an impulse buy. So I’m offering free shipping on all my products. And so far, my items are small/light enough to not cost that much to ship. But we’ll see how it goes with future purchases.

(2) Price point is a hard thing to figure out.

Of course, before I opened the shop, I did a little bit of research, and I found that items similar to the ones I will be selling go for several different prices. One pillow with a felt appliqué was on sale for $75, another on sale for $20. And there wasn’t much of a difference between them. So I decided to pick a price on the low end – $25. Then a friend suggested a start with an even lower price to encourage the first few sales, so I bumped the price down to $20. That same friend said she builds the Etsy fees into her prices. I like the idea but didn’t like the uneven number, so I just added 50 cents.

So to review, a felt appliqué pillow at For the Love of Felt costs $20.50. (For now, at least. You should get it while the prices are low.)

(3) Making those first few purchases are hard.

I’ll admit, when I opened my Etsy shop and posted a link on my Facebook page, I thought I would sell a good amount of items to friends and family. But instead, I sat there and watched the stats increase as 50.. 60… 90 people “viewed” my shop, but didn’t buy anything. I guess you are never a prophet in your own hometown. Though after two weeks, my sweet mother proved she is the best, and purchased a pillow! My first purchase – I was stoked. I have only made one more purchase since, and I’ll still trying to figure out how to turn my shop’s viewers into buyers. (If you read this before midnight, the entire shop is 25% off for Cyber Monday.)

I still have lots to figure out and learn about running a shop on Etsy, but I’m taking the first steps. By all means, check the shop out for yourself, and if you feel compelled, share it with others. And hopefully one day I can call this endeavor a success.

Flowers through a Window

IMG_3146

Several months back, I purchased this old window at a savage sale, and finally, I decided to do something with it. I found an image online of similar-styled flowers, and I was inspired!

I find it rather annoying to paint on windows. I just use acrylic paint, but if you know of short cut or trick, I would love to know! Though I do like that if you make a mistake, you can easily wipe it off and start again.

IMG_3120

Baby Carrots

Growing carrots requires patience – lots and lots of patience. But after almost 2 months, I finally have something to show.

DSC_0275

I read in an old Southern Living Garden Book that it is vital to thin out the carrots at this point, removing some of the small carrots to make room for the rest. Easy. With all of the rain this summer in the Southeast, I have really been able to ignore the carrots and let them grow.

If you want to plant your own carrots in a 5 gallon bucket, read my original post [here].

DIY Anthropolgie’s “Pomdelion Bouquet”

20130814-222110.jpg

If you are like me and treat the Anthropolgie’s website like Pinterest, then you too will notice that some of the expensive items they sell are actually really easy (and very cheap) projects you can make yourself. Take for example the store’s “Pomdelion Bouquet.” You can buy these yarn pom-pom flowers for $18 each or make as many as you want for less than $5.

20130709-185955.jpg

I’ve made these flowers before and explained how to make them in a pervious post (aren’t I so trendy.) But I will give Anthropolgie’s credit for using the golden-yellow colored yarn. Lucky for me, my roommate had some leftover yarn of the same color from a Harry Potter scarf she made months before.

20130709-185723.jpg

Once I made the pom-poms (again, see link posted above), I simply glued on a piece of green felt as the leaves and a piece of floral wire as the stem.

20130709-185733.jpg

With a cute vase from Ikea, these yarn dandelions were the perfect addition to my cubicle at work.