Cookie Monster ‘Trunk or Treat’

Earlier this year, my mom accepted a position as a director of children’s ministries at a church near their house. With Halloween approaching, she began planning her first-ever Trunk or Treat event. And since Mom was in charge—and Dad and I are people who don’t like to be outdone—we brought our A-game by creating a monster-sized idea.

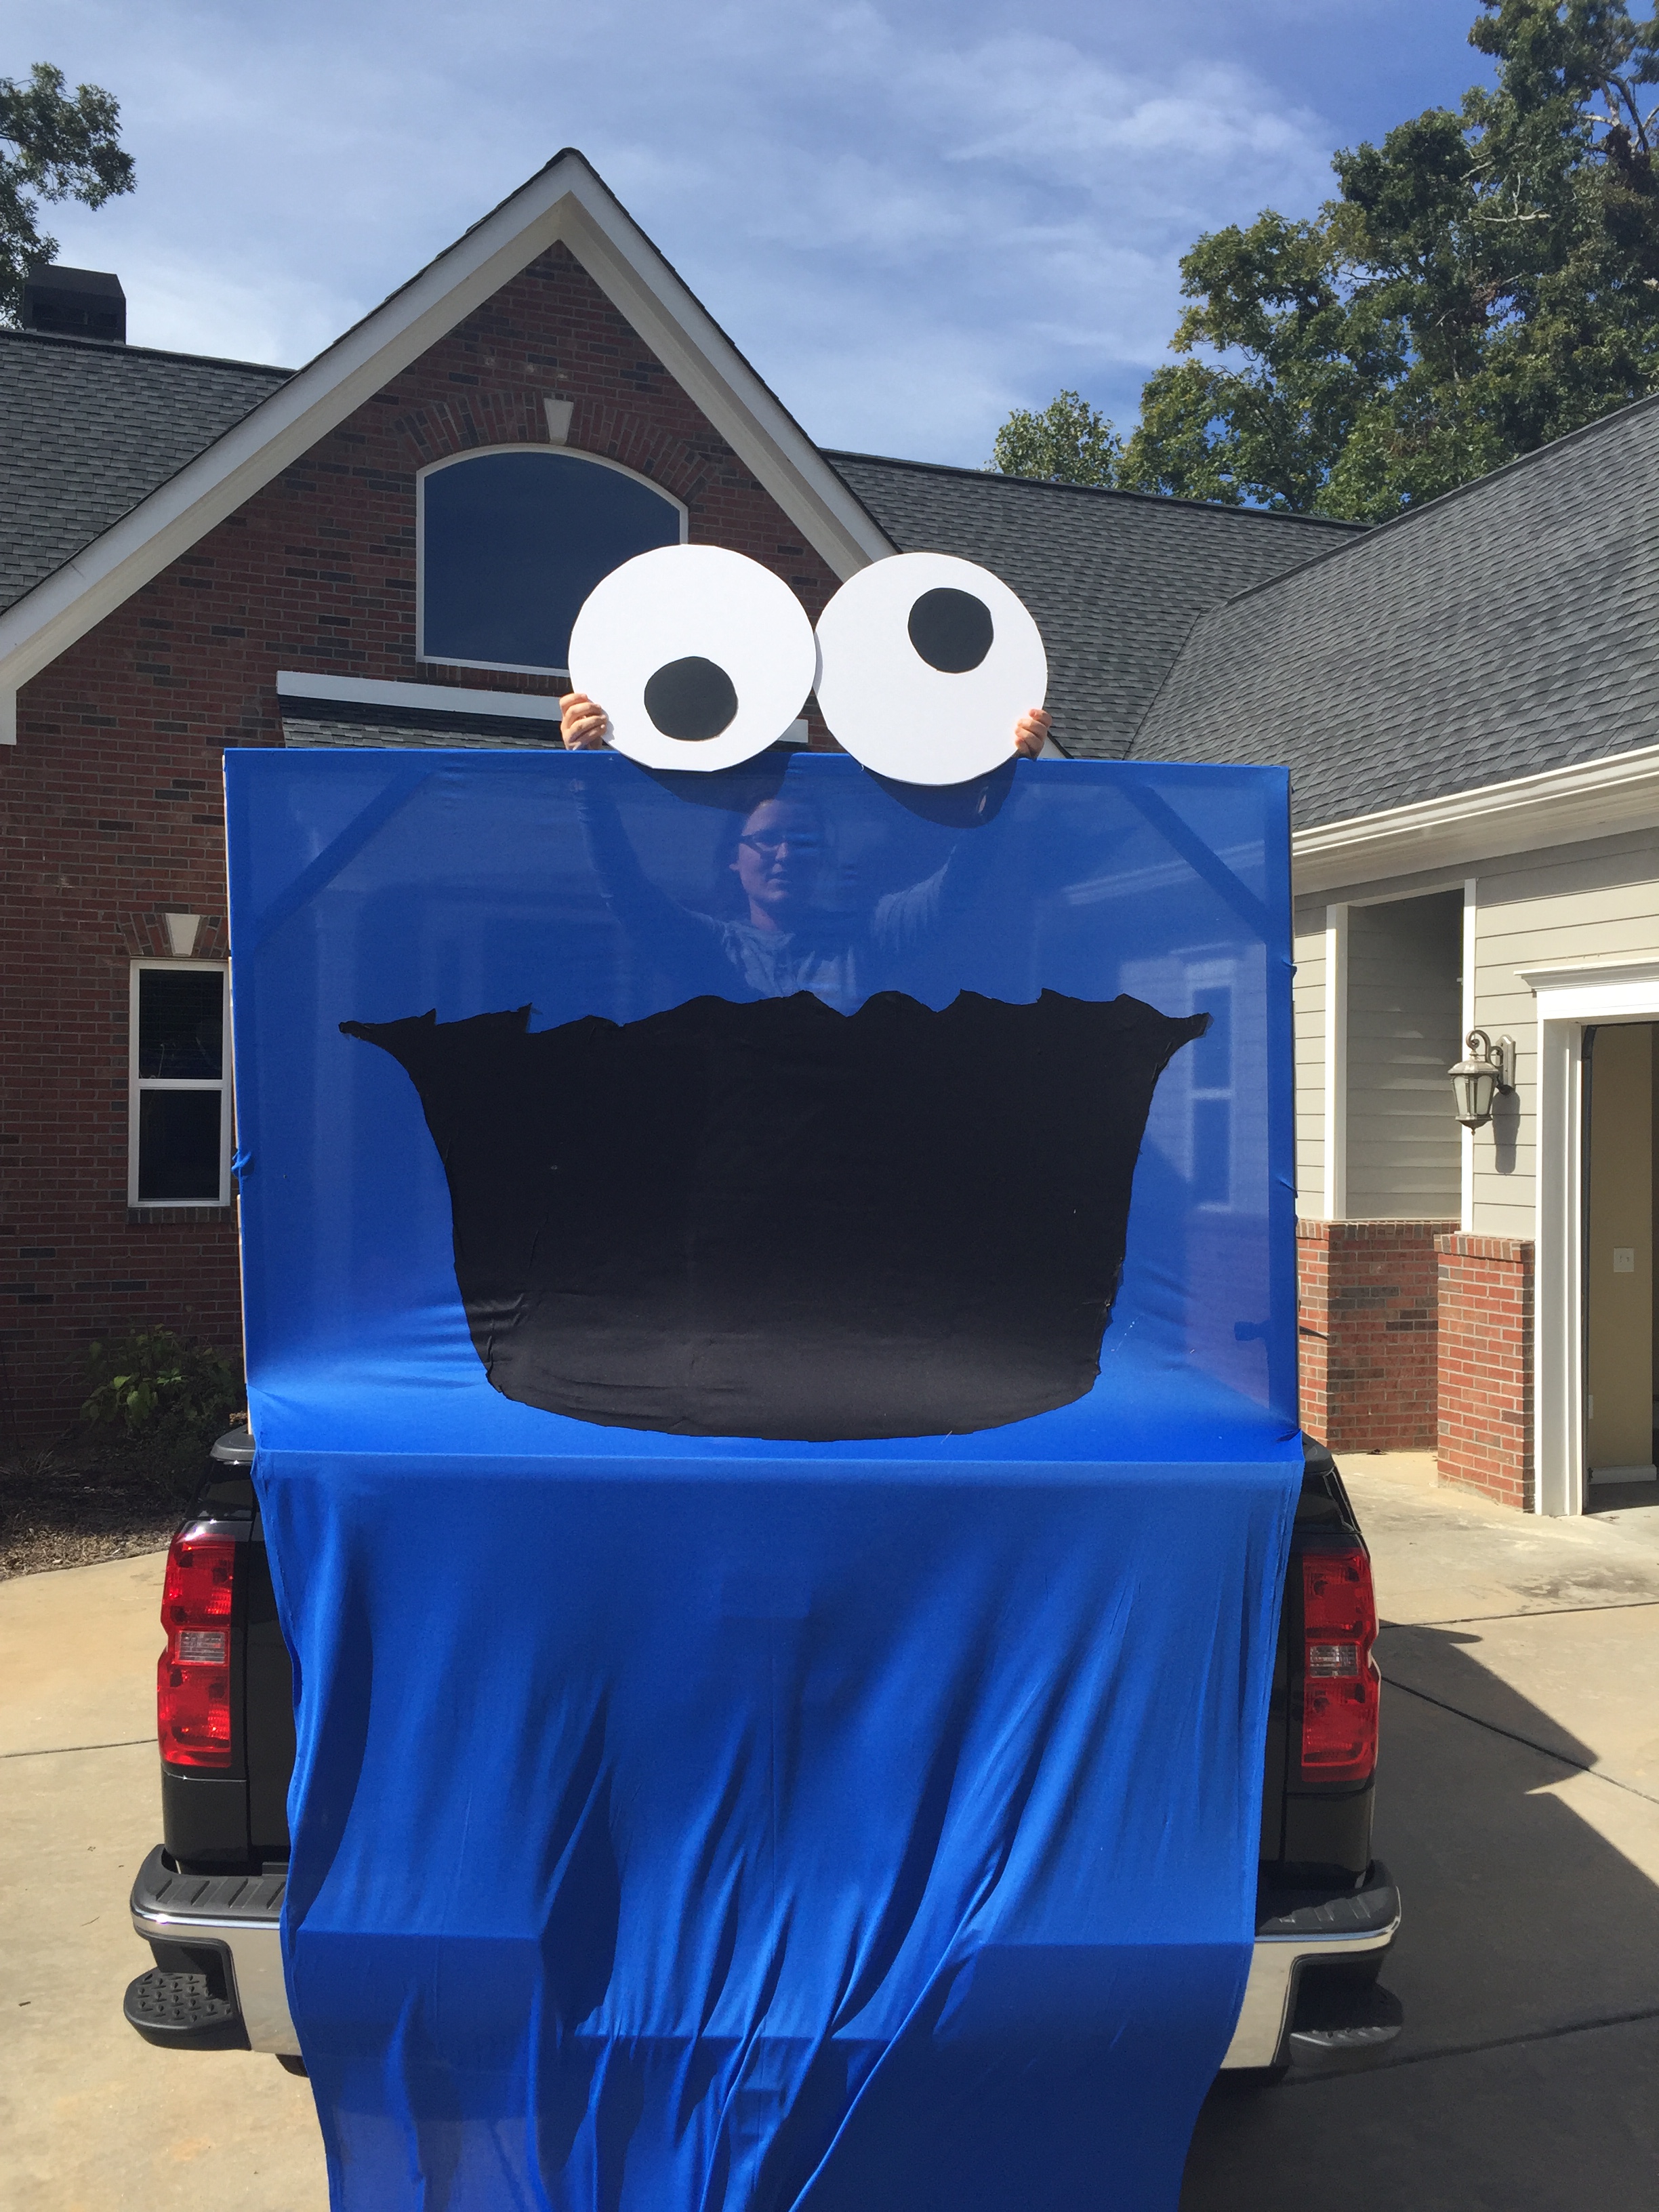
We used his truck to create a larger-than-life Cookie Monster display. (And I’ll go ahead and spoil the ending for you, we took home the top prize!)

IMG_8365.JPG

I love creating projects with my Dad because he always brings out the power tools. We started the display by creating the wood frame. His truck bed had two notches along the top that could fit the legs of our frame, helping it stand up. (I’m not sure what the technical name or use of these notches are. Sorry, I’m not a car person.)
IMG_8343IMG_8345


IMG_8348.JPG

Once the frame was complete, we wrapped it with cheap blue fabric we found at Walmart. (The key to creating Cookie Monster is all about finding the right color blue.) We ended up letting the blue fabric hang low to cover up more of the truck.

Note: I love the picture below because it shows how exacting my dad is. We couldn’t just cut out a circle. We had to use an Xacto knife.

IMG_8352.JPG

I used black fabric (the same cheap fabric as the blue) to cut out a mouth, and we used poster boards to create the eyes. We decided to not attached the eyes until we actually got to the event because we thought there was a high risk they could be damaged in the drive to the church. But I attached the black fabric mouth with spray fabric adhesive.

IMG_8355.JPG

With the display complete, the next step was to create the corresponding game. In the church’s storage room, my dad found a wooden bean bag toss board. He brought it home and covered it with blue felt. I create a similar black mouth out of fabric, and we created another pair of the eyes.

Finally, I made felt cookies as the bags kids would toss into Cookie Monster’s mouth. At the local Walmart, we found 1-pound bags of beans, and I stuffed the felt cookies with the bags as-is. (Aka I didn’t open the plastic, keeping it as the container for the beans.)

IMG_8357.JPG

IMG_8368.JPGLike I said at the top of the blog post, there was a contest for the best display at the Truck or Treat. We won!

Advertisement

Felt Christmas Stockings

It’s been a year and a half since I logged into this WordPress site, and this great hiatus is not because I’ve stopped crafting. Goodness, no. But instead, I let this project that once brought me tremendous joy sail away with other seasonal life interests. I could blame the busyness of work or that I’m now taking graduate classes at night. But in truth, I think the joy that led me to create this blog began to fade a year and a half ago, making a fun side hobby feel more like work.

Well, as some people say, never throw anything away because its bound to come back in style.

Over the Christmas break, I was inspired to read through the countless blog posts I have here. Of course, it’s a little embarrassing to see how many spelling and grammatical errors exist (and I’m sure there are a few in this post too), but the walk down memory lane was fun. At the same time, I was creating felt stocking for my parents, using patterns/kits by Bucilla.

IMG_8661.JPG

Christmas was a little different this year for my family. My mother was recently diagnosed with cancer, and two weeks before Christmas, she underwent a very intensive surgery that caused an extended hospital stay. My parents live in Georgia; I live in Alabama. So for several weeks, I made the trip back and forth.

As I’ve said on this blog before, my mother has the best advice, and her crème de la crème is this: Know what makes you happy, so when times turn sad, you have tools you can use to lift yourself up.

My greatest tool is crafting and sewing… and a whole of prayer. I can’t remember when the idea came to me, but I know this project of creating felt stockings was one of the greatest blessings during this difficult time.

IMG_8671.jpg

Not only did the kits throughly entertain me during a time where there was a lot of sitting around, but they able gave me a focused line of thought on something positive and beautiful.

I finished my dad’s stocking before the surgery, and I worked on my mom’s throughout her recovery in the hospital. Once it was finished, I was able to hang it on her wall, adding a bit of Christmas decoration to her small hospital room.

And I will note: the kits were amazing portable. I utilized small jars to organize the beads and sequins, using a magnet on the underside of the lids to store the sewing needles. I was able to contain everything I needed in a single freezer zip lock bag, so no matter where I was—siting at my craft table, the floor of a waiting room, the chair in the hospital room, etc.—I was able to work on it.

IMG_8766.JPG

Mom ended up leaving the hospital on Christmas afternoon, and in the following days, we opened presents and tried our best to celebrate a normal holiday season. The new stockings for Mom and Dad hung on the mantle with the felt stockings Mom made for me and my brothers when we were born.

IMG_8803.JPG

I’ve been writing a lot about this season I just experienced, mainly in Word documents that one day may see the light of day. In doing so, I felt the joy that I once had for this blog rising back up with in. So here I am, back for reading pleasure. The good news is, I have a lot of content from the past year and a half that I can share with you. I hope you enjoy.

Celebrating Christmas in July with Yarn-Wrapped Ornaments

The folks over at Patience Brewster reached out to me last week with a question: How are you celebrating Christmas in July?

I loved the line they used in their email, “Though we do flourish when the sun is high in the sky and the flowers are blooming, our minds are always on Christmas!”

I’ll admit, I have a hard time thinking about Christmas when it’s 100 degrees outside, but looking through Patience Brewster’s Christmas line, I was inspired by the colors she uses. Despite winter being a cold, dark-colored month, Patience uses bright, bold colors that remind me of summer.

So I reconsidered the question, and I have an answer.  I celebrate Christmas in July by making the projects I ran out of time to make last year, like these yarn-wrapped Christmas ornaments.

IMG_0549

I had all of the materials to make this project because I had purchased the Styrofoam balls last December. Alas, you can only do so many Christmas crafts before the magical days finally arrives. (I understand why Santa needs all year to prepare.)

This project is also a great way to use leftover yarn (which I have by the basketfuls). Otherwise, you’ll need Mod Podge, a paintbrush (for the glue) and a knitting needle (which I used to poke a hole through the ball.)

IMG_0532

Using the knitting needle, I guided a long piece of yarn through the hole, and then brought it back around the ball to knot at the top. And as you go about gluing on the rest of the yarn, try to keep these pieces out of the glue. When you’re done, tie the two loose pieces together to be the string that attaches the ornament to the tree.

IMG_0534

Starting in the middle, I painted the Mod Podge along the circumference, and then I slowly wrapped the yarn around the ball, gently pressing the yarn into the glue. Though you can continually work until you’re done, I think it’s beneficial to occasionally stop and let the glue dry, especially if you get too much glue on your fingers. (I find it helpful to let them dry as they hang. My chandelier proved to be the perfect drying spot.)

IMG_0538

For the more colorful ornament, I applied the yarn in pieces instead of continuing wrapping it. This version definitely takes longer (and if you’re like me and dislike glue, it definitely requires more patience).

IMG_0547

I think I’ll let these decorate my gardenia bush for a little bit before I store them away with other Christmas ornaments. But thanks to Patience, I definitely have Christmas on my mind. Once you start to think of Christmas ideas, it feel like the opportunities are endless.

Felt Valentine’s Day Sweetheart Candies

DSC_0690

When I asked my roommate if she minded I decorated our house for Valentine’s Day, she laughed. “Just hold back on the pink,” she said.

I love Valentine’s Day! So when I started to brainstorm ideas for spring felt products for the Etsy shop, felt Sweetheart candies – right in time for Valentine’s Day – quickly came to mind.

DSC_0680

Each bag comes with 20 little felt hearts, 4 of each color. (Note: this number later seemed ridiculously high when I was working on completing 16 bags – 300 hearts total.) Each heart is actually 3 layers of felt, hand sewn together.

DSC_0684The felt bag – meant to replicate the Sweetheart box – is completely hand sewn using a blanket stitch. The bag has 5 pieces: the two large rectangles for the front and back, two side piece and one bottom piece. To help with size consistency, I created templates out of card stock (which is a little out of character for me!)

DSC_0685   DSC_0683

Using a blanket stitch did make the production time longer, but I think the homemade touch elevates the overall product. And so far, the product has been a major hit.

DSC_0681

So what are you waiting for? This bag of felt candy is the perfect gift for your little Valentines. Plus, you don’t have to worry about cavities!

IMG_5105   IMG_5106

Side note: One customer asked me to create a felt bag with a flap (since she thought the felt hearts would quickly be lost otherwise). I was happy to oblige. I went back and forth about using a velcro dot (seems dangerous around felt), but (confession) it was my laziness that made the final decision. I couldn’t find a button to use around my house and I was too lazy to run to the store. Luckily, the customer didn’t mind!

Anthropologie-Inspired Felt Christmas Stocking

IMG_4921I know, I know. I’m writing about my Christmas stocking in the final days of January, but to my defense, this month has flown by. I’m ready to flip my calendar to February with hopeful thoughts that next month won’t be as crazy.

But back to Christmas: this year I decided I wanted to buy a nice Christmas stocking, one that I would treasure year after year. When I stumbled across this stocking at Anthropologie, I was instantly smitten, but the price tag made me think twice. The thought is almost reflexive at this point: I could totally make this!

IMG_4907I’ll keep the picture of the Anthopologie stocking small because when placed side-by-side, my stocking looks pretty “crafty” in comparison. The difference is in the quality. I’m sure Anthopologie used expensive wool. I used acrylic felt from Hobby Lobby. They used these adorable mini pom poms with a trendy color pallet. I was stuck with the primary colored trim selection at JoAnn Fabrics.

Don’t get me wrong, I love how my stocking turned out, especially when you compare the price. I spent about $8. The item is now out of stock, but I remember Anthropologie selling it for almost $50.

IMG_4916

In my excitement of the project (plus, I made it really late at night and the lighting would have been a mess), I didn’t take many step-by-step pictures. But the process doesn’t venture far from a normal Christmas stocking tutorial. After cutting out the main piece of the stocking, I simply attached rows of trim. And instead of using my sewing machine, I used a blanket stitch to hand sew the stocking together. I used light blue thread to provide a little contrast.

My final touch was the accent of purple and magenta yarn pom poms. I hunted for the white yarn in the similar style, but after going to a few stores, I felt lucky to have stumbled across the purple yarn. So I made it work!

I’m sure when Christmas comes around this year, I’ll go through the same thought process of wanting a buy nice stocking. But for now, I’m excited that this Christmas stocking is mine.

Wine Bottle Christmas Decor

IMG_5031

World Market is a dangerous place. My roommate and I spend an hour last night wandering through its aisles, collecting an array of fun things for our home and our stomachs. Knowing I had a Christmas party to attend this weekend, I grabbed a bottle of wine for a hostess gift and turned to find a display of fun wine bottle decorations – like little scarfs, Christmas sweaters, etc. all sized down to fit a wine bottle.

Miniatures are simply the cutest! I picked out three different items that I was very tempted to buy. But I held back when I realize (like I often do) – I could totally make this!

And though I didn’t end up knitting a miniature scarf, I decided to make a pom pom one. Super easy and cheap to make. And as you know, I love making yarn pom pom. (See video for tutorial.)

For the Love of Gold Paint Pens

IMG_5026

The latest craze to hit my life: the beauty of a gold paint pen. I took the pen from my parent’s house to work on a project for my Grandmother’s birthday, and I’ve been playing with it ever since.

This week, I was putting together little gifts for my co-workers, and the pen came out. (I gave a gift card for a free pop from Steel City Pops, and because that place is so clever, a gift card is a stamp Popsicle stick.) I love, love, love how these cards turned out!

IMG_5032

Felt Christmas Poinsettia

il_570xN.695859870_5bn6

When I came home with the wrong size terra cotta pots (The felt cactuses I sell on Etsy use 3-inch pots; I purchased 2-inch pots), I decided to make the most of my mistake. The result were these adorable, mini felt poinsettias.

il_570xN.695859804_lv22   il_570xN.695983863_gjil

Similar to the felt cactuses I sell, each flower is attached to felt “dirt” and come with a real clay pot.  Teach your little ones to love gardening early on as they can “plant” their flowers over and over again. (And bonus, no mess to clean up or dead plants to deal with.)

il_570xN.695859840_lphd

To create the flower, I used a similar approach to how I create the cactus flower. I took a small rectangle of yellow felt and cut slits along the width. I did the same with a small white rectangular piece of felt. I then rolled up the yellow felt and continued with the white, creating the center. Next, I hand-cut the red petals (sorry, I don’t have templates) – 5 smaller petals and 5 slightly larger ones – and 4 large green leaves. I then attach them one-by-one until the flower is complete.

il_570xN.695983941_r84u

The miniature size is what gets me. My gosh, these flowers are just so darn cute!

Rosemary Wreaths

IMG_4981

Growing up, my mother had the best mottos to live by. My favorite: “Always know what makes you happy.” So when the struggles of life seem too much to handle, you know what activities or items can help pull you up. For me, crafting is my go-to tool for happiness.

My Thanksgiving was a week of personal struggles. I had to have surgery on my left eye. The anticipation was a heavy mental burden, and the post-op pain and physical injury was not easy either. So on Sunday after my surgery, when I was finally starting to feel more normal, I sat down and created a simple rosemary wreath.

I didn’t worry about taking pictures of my process (sorry), but trust me, rosemary wreaths are so easy to create. And I was able to use items I already had available.

I used an embroidery hoop as my wreath’s base. (You could use so many other forms, but this is something I already had at the house). Using more heavy-duty scissors, I cut 8-inch sprigs of rosemary from my parent’s garden. Then I made small bundles (with 2 or 3 sprigs each) and use a rubber band to secure each one. Then I used floral wire to secure each bundle to the embroidery hoop. And if necessary, I used the floral wire to secure a few odd sprigs that didn’t flow well in the circular shape.

And that’s it. The 30 minutes it took to create this wreath did wonders for my overall well-being. Plus, it made the room smell so wonderful! Pardon the cheesiness, but these moments of happiness are the best kind of medicine.