Anthropologie-Inspired Felt Christmas Stocking

IMG_4921I know, I know. I’m writing about my Christmas stocking in the final days of January, but to my defense, this month has flown by. I’m ready to flip my calendar to February with hopeful thoughts that next month won’t be as crazy.

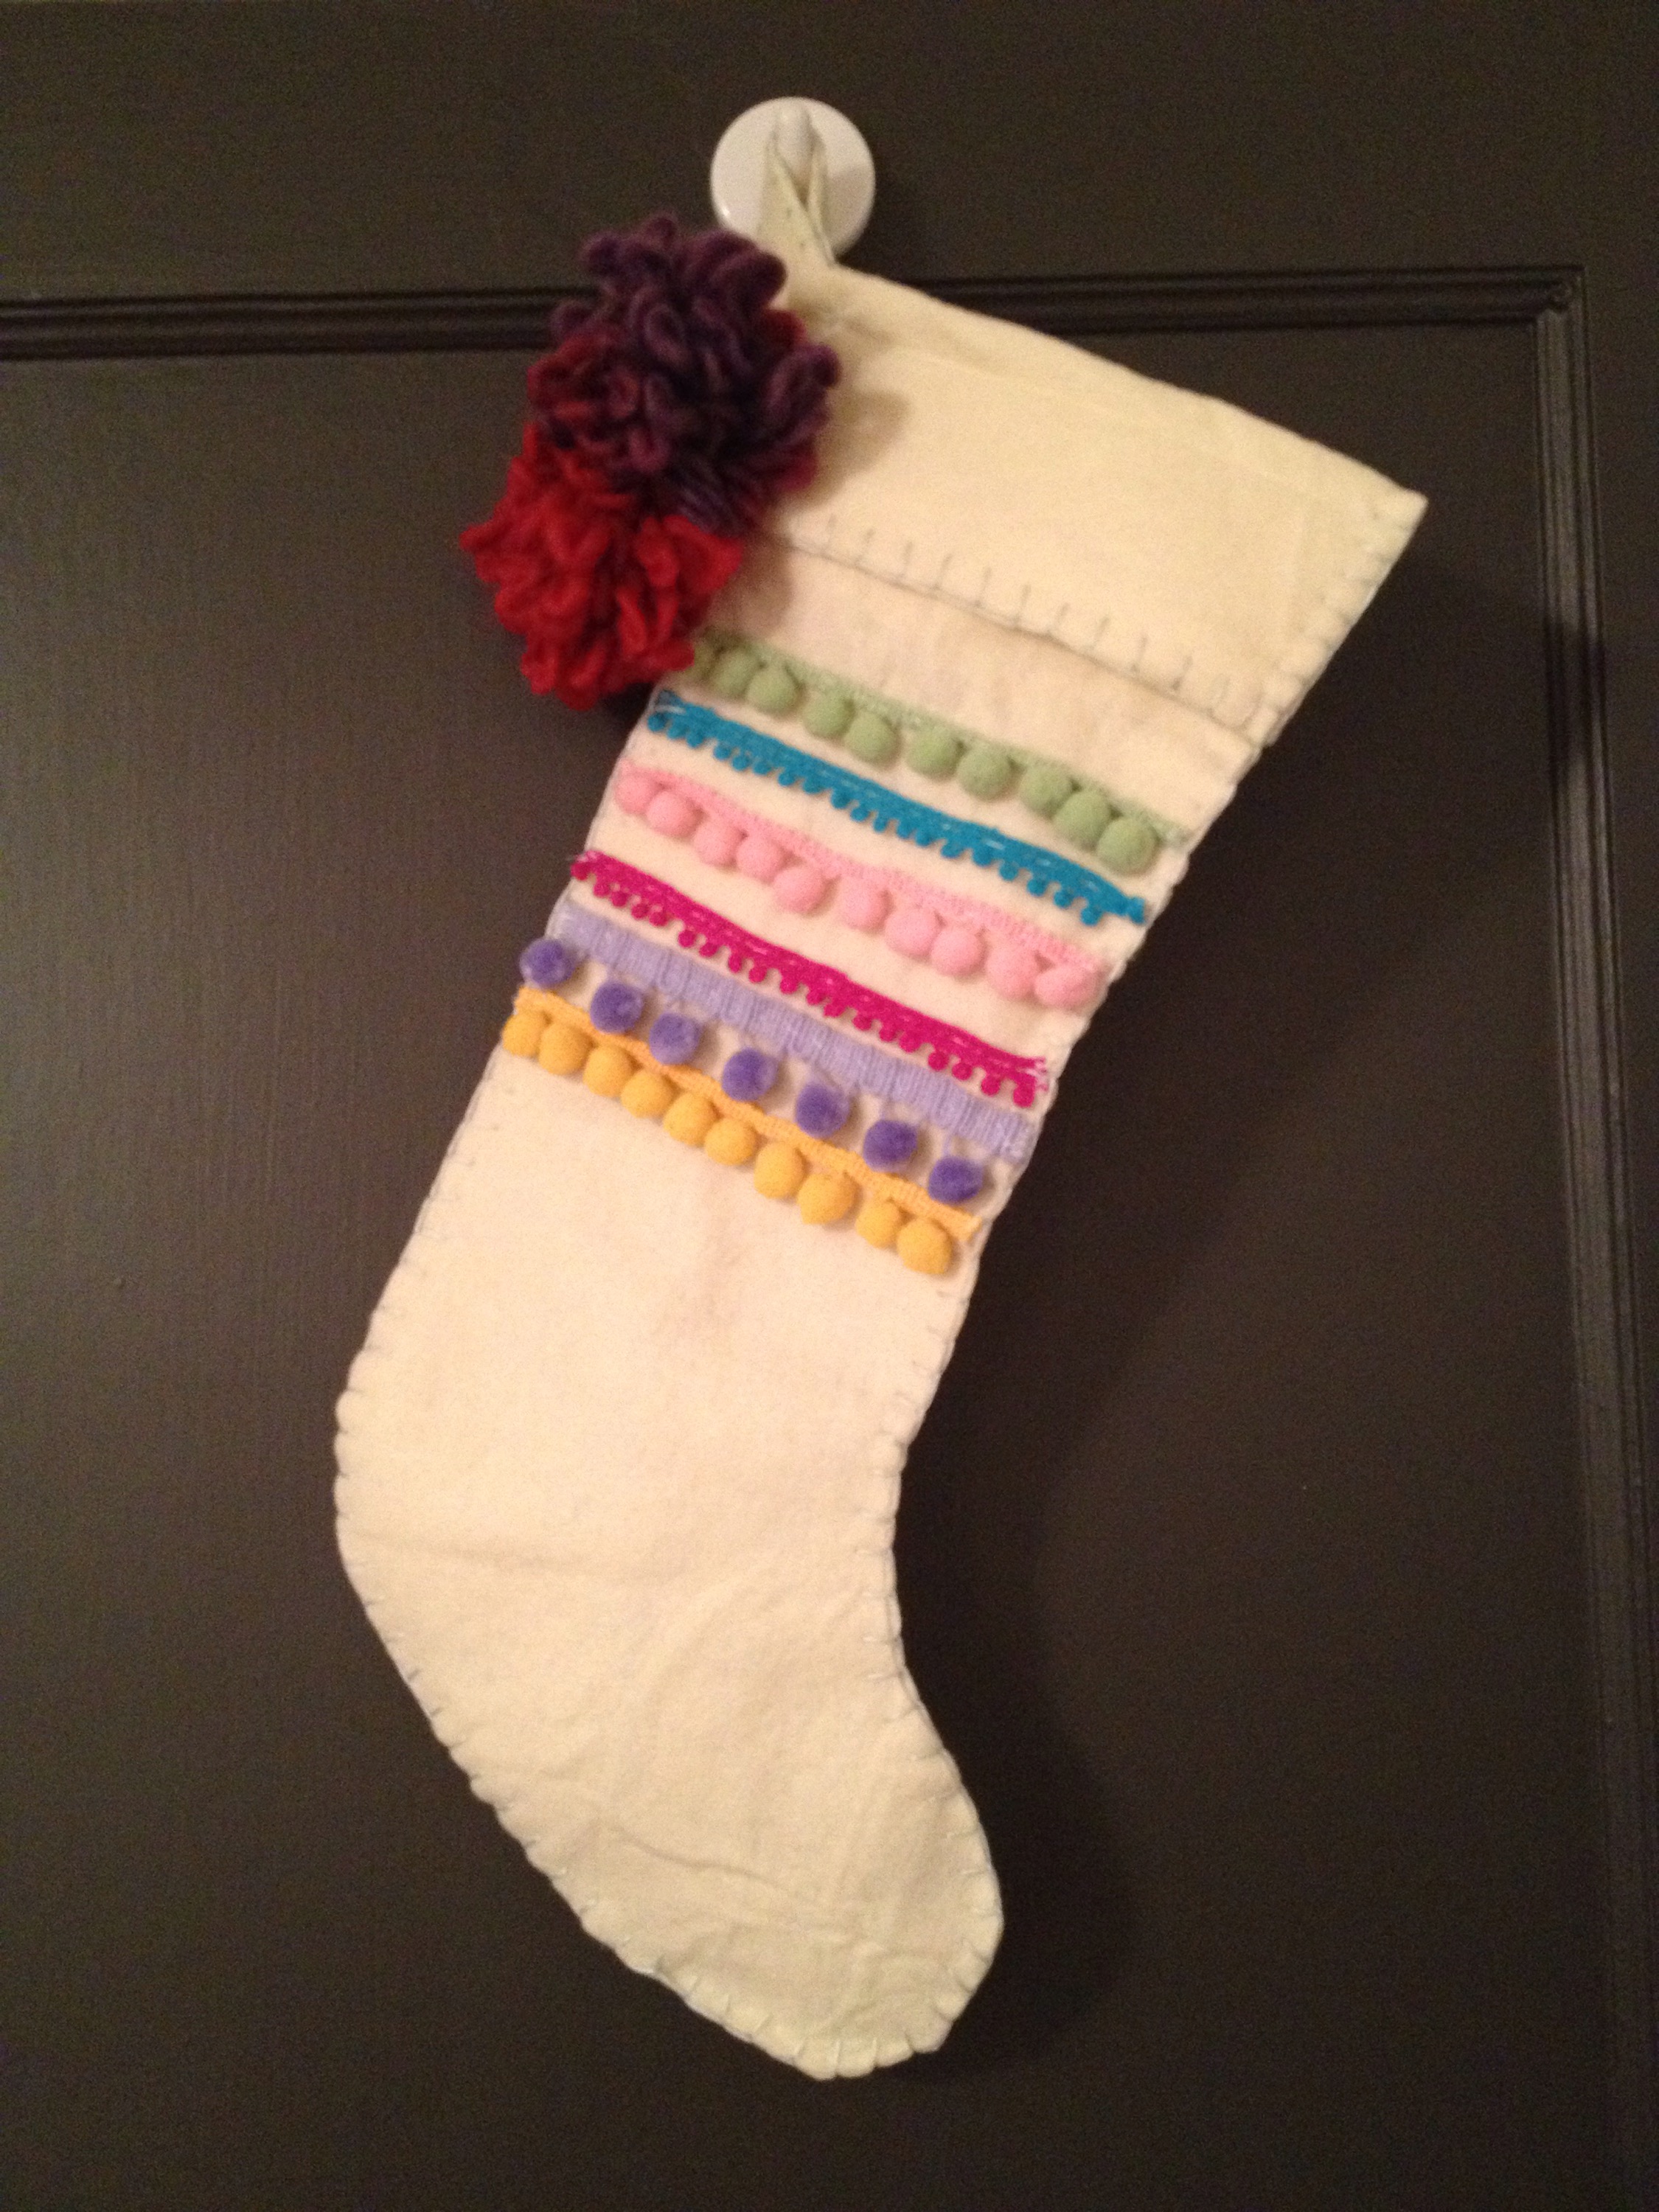
But back to Christmas: this year I decided I wanted to buy a nice Christmas stocking, one that I would treasure year after year. When I stumbled across this stocking at Anthropologie, I was instantly smitten, but the price tag made me think twice. The thought is almost reflexive at this point: I could totally make this!

IMG_4907I’ll keep the picture of the Anthopologie stocking small because when placed side-by-side, my stocking looks pretty “crafty” in comparison. The difference is in the quality. I’m sure Anthopologie used expensive wool. I used acrylic felt from Hobby Lobby. They used these adorable mini pom poms with a trendy color pallet. I was stuck with the primary colored trim selection at JoAnn Fabrics.

Don’t get me wrong, I love how my stocking turned out, especially when you compare the price. I spent about $8. The item is now out of stock, but I remember Anthropologie selling it for almost $50.

IMG_4916

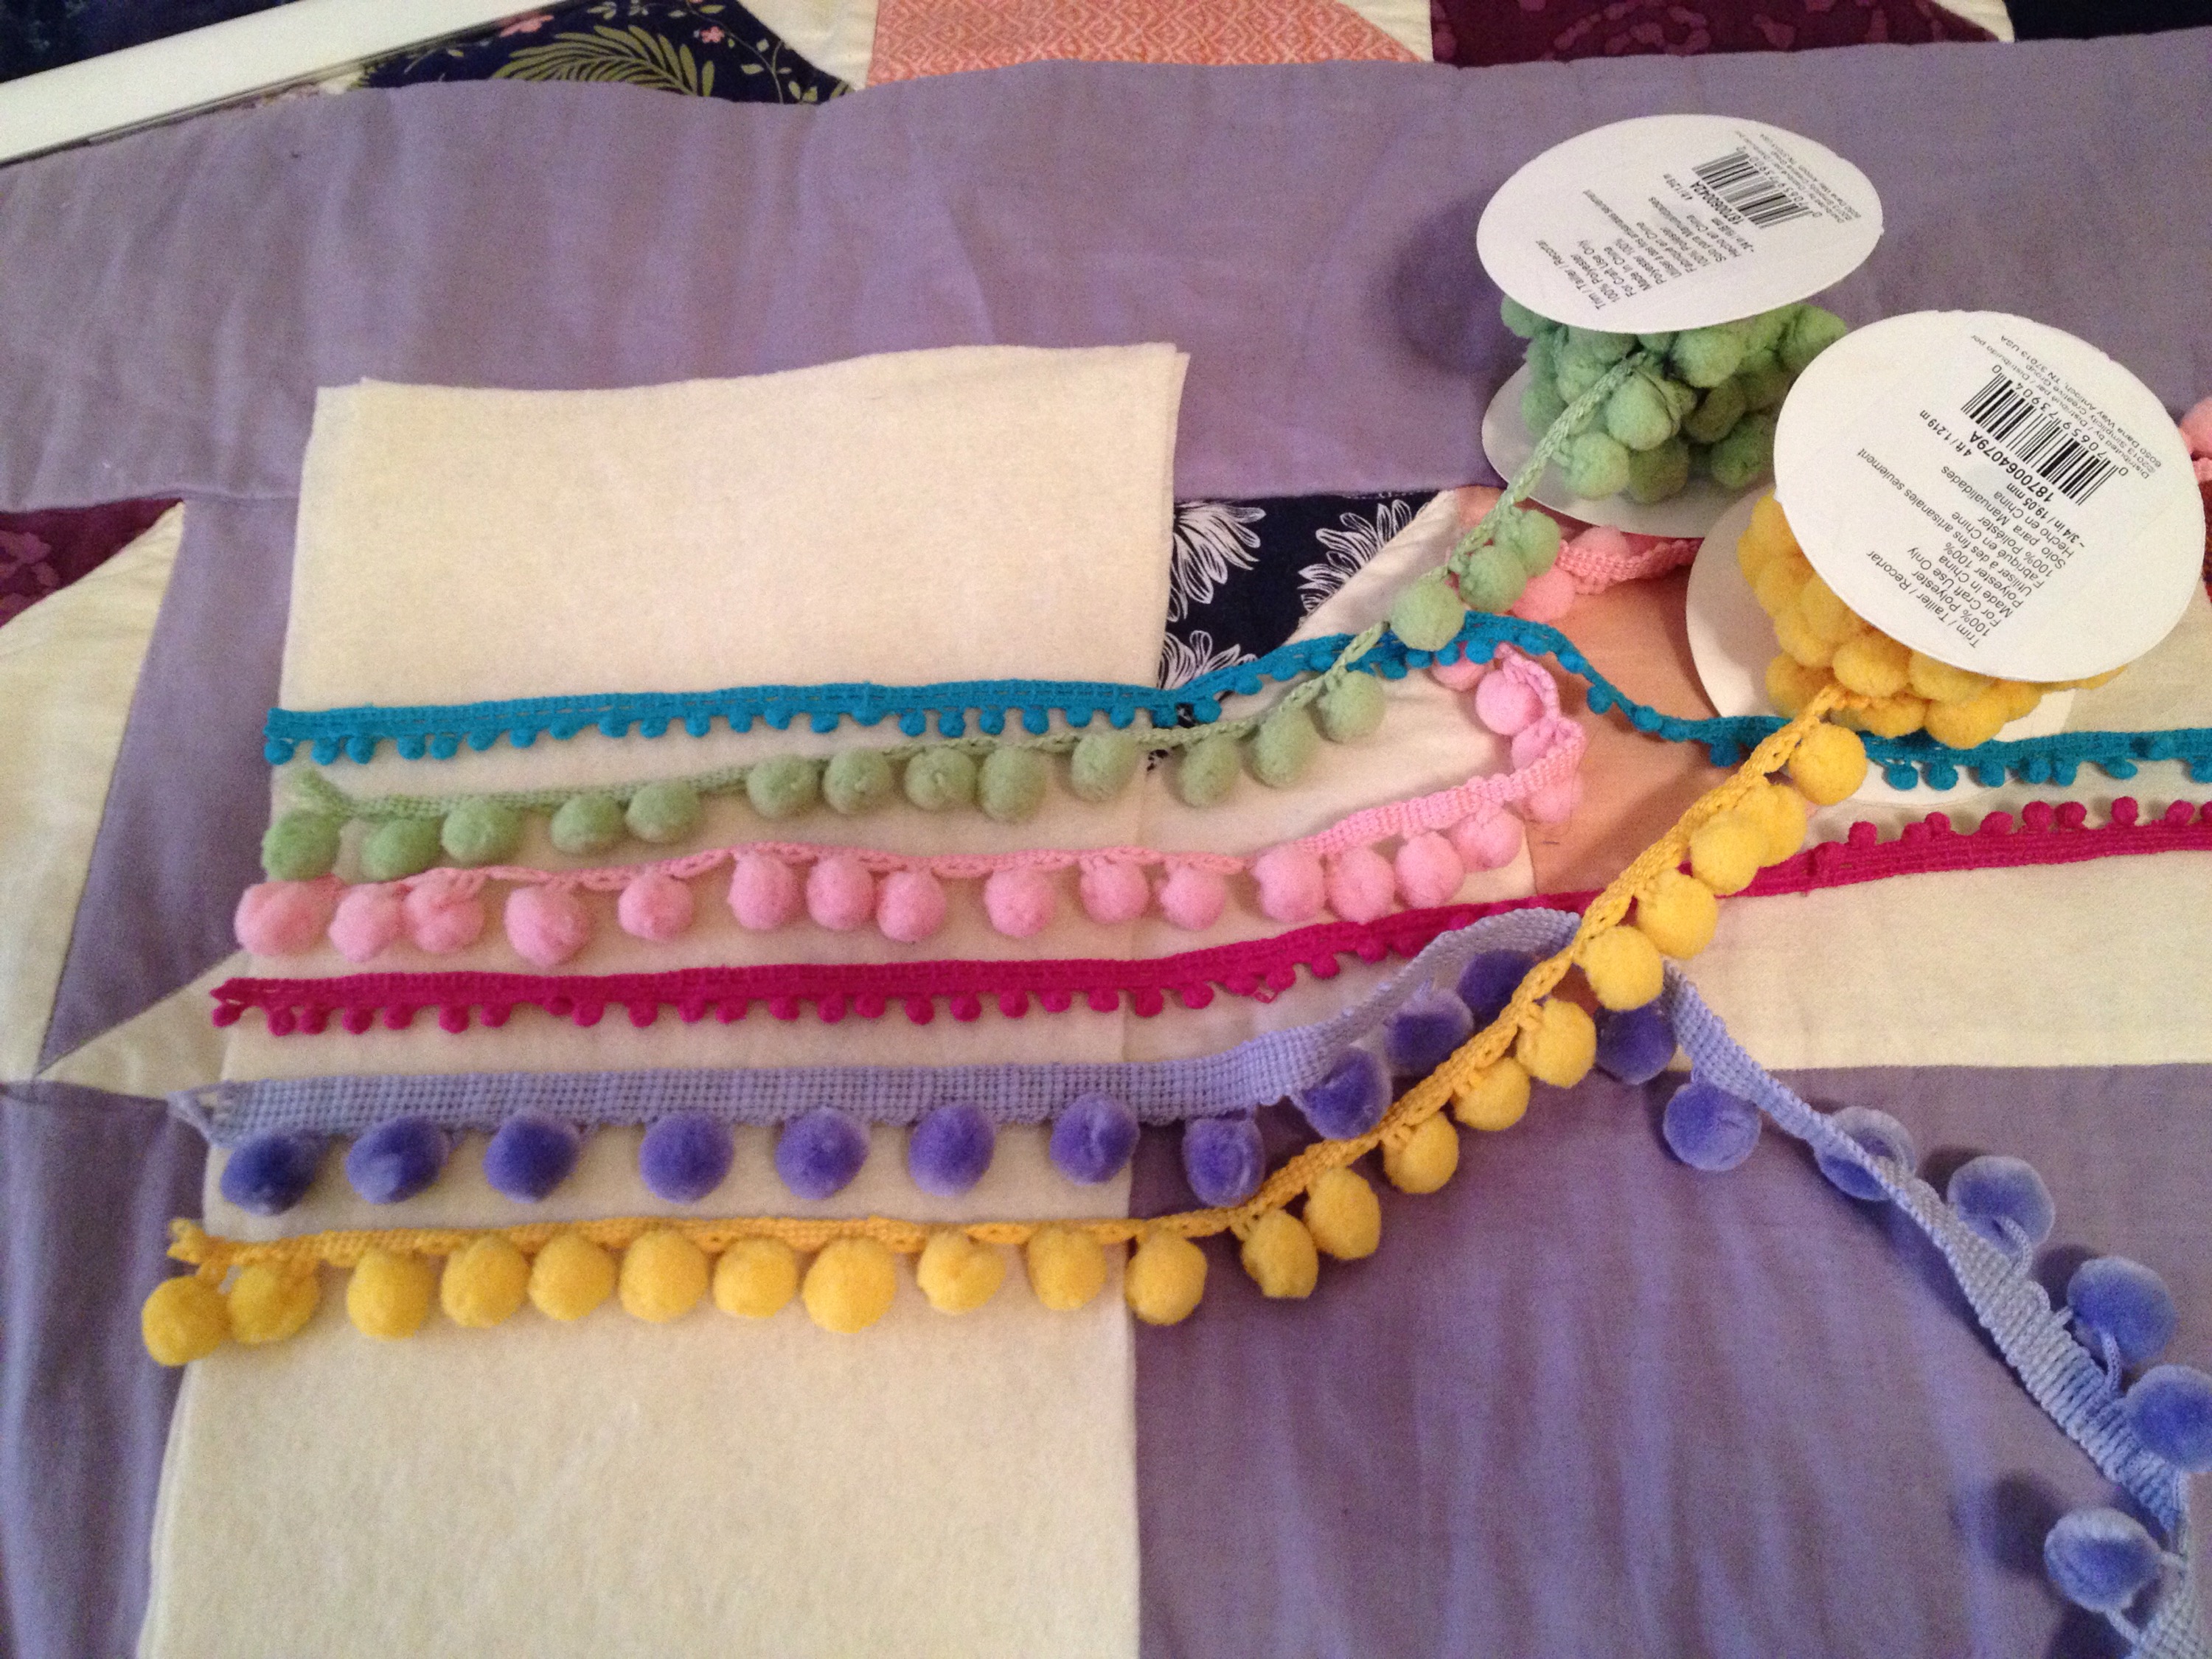
In my excitement of the project (plus, I made it really late at night and the lighting would have been a mess), I didn’t take many step-by-step pictures. But the process doesn’t venture far from a normal Christmas stocking tutorial. After cutting out the main piece of the stocking, I simply attached rows of trim. And instead of using my sewing machine, I used a blanket stitch to hand sew the stocking together. I used light blue thread to provide a little contrast.

My final touch was the accent of purple and magenta yarn pom poms. I hunted for the white yarn in the similar style, but after going to a few stores, I felt lucky to have stumbled across the purple yarn. So I made it work!

I’m sure when Christmas comes around this year, I’ll go through the same thought process of wanting a buy nice stocking. But for now, I’m excited that this Christmas stocking is mine.

Advertisement

Holiday Yarn Pom Pom Garland

_DSC0182

As you know, I love a good pom pom made (See: Pom Pom Flowers), so when it came time to decorate for Christmas, I thought I would whip up an easy pom pom garland. And though I have already posted a tutorial, I figured it would a refresher wouldn’t hurt. And this time, instead of telling you, I thought I would show you!

Need it now? You can buy the garland on Etsy today for $15.50.

Flowers through a Window

IMG_3146

Several months back, I purchased this old window at a savage sale, and finally, I decided to do something with it. I found an image online of similar-styled flowers, and I was inspired!

I find it rather annoying to paint on windows. I just use acrylic paint, but if you know of short cut or trick, I would love to know! Though I do like that if you make a mistake, you can easily wipe it off and start again.

IMG_3120

DIY Anthropolgie’s “Pomdelion Bouquet”

20130814-222110.jpg

If you are like me and treat the Anthropolgie’s website like Pinterest, then you too will notice that some of the expensive items they sell are actually really easy (and very cheap) projects you can make yourself. Take for example the store’s “Pomdelion Bouquet.” You can buy these yarn pom-pom flowers for $18 each or make as many as you want for less than $5.

20130709-185955.jpg

I’ve made these flowers before and explained how to make them in a pervious post (aren’t I so trendy.) But I will give Anthropolgie’s credit for using the golden-yellow colored yarn. Lucky for me, my roommate had some leftover yarn of the same color from a Harry Potter scarf she made months before.

20130709-185723.jpg

Once I made the pom-poms (again, see link posted above), I simply glued on a piece of green felt as the leaves and a piece of floral wire as the stem.

20130709-185733.jpg

With a cute vase from Ikea, these yarn dandelions were the perfect addition to my cubicle at work.


His Grace


Anthopologie sends catalogs to my parent’s house, and every time I come home, I have a nice little stack sitting on my bed. Perfect for a little collage.

Confession – I found this on Pinterest, and it just looked too easy to not recreate it. The whole thing says, “If His Grace is an Ocean, we are all Sinking.” This Anthopologie catalog used beach/desert scenery, which worked perfectly. I cut out the words Grace, Ocean and Sinking, using a similar color scheme for each word.

I used ModPodge to glue the letters to the canvas. When them in place, I simply used a paint pen to write in the other words. Even though I ended up selling this one at the Spring Fling Flea Market, I think I’m going to make another one for myself.

A letter for a friend

Back in 10th grade, I found this tutorial at a craft store about how to turn these cardboard letters into fabric letters. My large S still hangs in my room at my parent’s house, soI think it’s safe to say that 5 years later, I have mastered this craft.

K is for Karlie, my dear friend who had a birthday coming up. Luckily, I had a ton of batting and scrap fabric so all I needed to make this was the cardboard letter. I started by cutting the batting (2 layers of it) to the exact shape of the K. I did this for both sides.

Next, with the fabric I had chosen, I cut out a K with extra margins. Layer the batting on top of the cardboard letter and then the fabric on top of that. I used a hot glue gun (but you can use any adhesive) to glue the fabric in place, attaching the margins to the sides of the cardboard letter. Just make sure the fabric is taunt. Do this for both sides.

With that complete, I took the other fabric and made a strip that I could use for the sides. To make this strip of fabric, I cut it out and then folded and ironed the edges to make smooth edges. Simply glue the fabric in place, folding back the final edge so no raw edges are showing.

And there you have it. It’s super easy and makes an awesome gift!

50 Nifty United States

I am a big fan of Pinterest because it opens the door to many craft blogs I would never have found on my own. This project is the first one I have completely copied from the website. I figure if it ain’t broke, don’t fix it! Plus, I’m always a sucker for a good map.

Thanks to a box of fabric so lovingly given to me by my aunt and old puzzle from my childhood, this project is super easy and super cheep!

I used the puzzle to make stencils on printer paper. When cutting each state out, don’t cut on the line but instead around it. Then I found a piece of fabric for each state (note, I chose not to do Alaska and Hawaii).

Next, I used Heat-n-Bond which I purchased at Joann’s. The directions on the package is pretty clear, but basically, cut a piece the size of the fabric. Iron the liner side. Cut the fabric to the shape you want (in this case, the shape of the state). And then once I had each state in place, I pealed off the liner and ironed it onto the muslin.

Above shows how I laid each piece out. Once ironed down, I took to the sewing machine to stitch the outline of each state. I used an embroidery foot (or a darning foot) for the first time. It was difficult at first, but you learn to get the hang of it.

I mounted the finished piece to a flat canvas (and when I say mounted, I mean I used packaging tape). I obsessed over the finished thing for about an hour, thinking I should definitely whip up another one. I could totally see this being sold at Anthropologie or Urban Outfitters for a crazy amount. Thanks to my box of scraps, this cost me less than $3!