Felt Gingerbread Cookies

When you think about iconic Christmas food, what comes to mind? For me, Christmas is all about gingerbread cookies. My loyal readers already know the amount of time I spend and the joy I have making Christmas cookies each year. (For you newcomers, click here and here for reference.) So when it come time to add a few Christmas items to my Etsy shop, I could stop myself.

il_570xN.683588826_6cq5

I didn’t just want to make felt gingerbread cookies. Because even though the felt cookies turned out so darn cute, the fun is in the baking.

il_570xN.683708045_1y9u

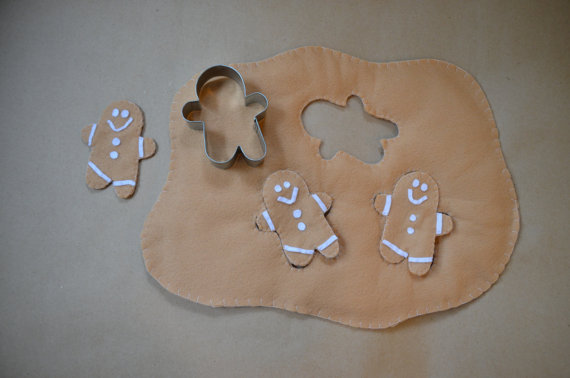
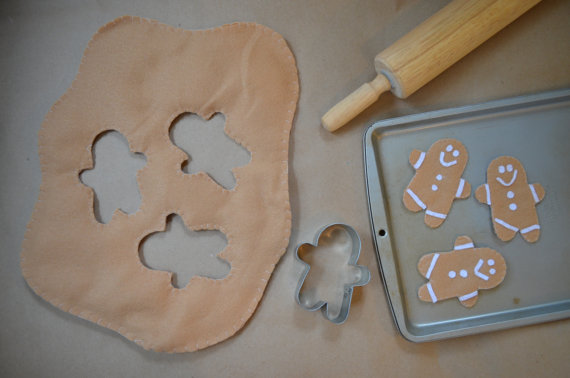
The set includes everything pictured above: 3 decorated [felt] cookies, a sheet of rolled out [felt] dough and the actual cookie cutter to match. (all for $12 – what a steal!)

il_570xN.683707825_q1qa

I didn’t try to make the cookies from the cut outs in the dough. This would have too much room for error. So I cut the cookies out (using a 99 cent cookie cutter from Target) from spare felt and use white felt to adorn them.

il_570xN.683588728_pu36

For the dough, I traced and cut out the cookie cutter shapes. I placed a layer of batting (leftover from a quilt project) between the two pieces of felt, and blanket-stitched the edges. The batting add some dimension to the dough, which I hope makes it more realistic when a child “rolls” it out.

il_570xN.683708083_ldou

I tried to leave as much room for a child’s imagination to go wild. Cookies fit the dough like a puzzle. And since the set includes the actual cookie cutter, they can pretend to “roll,” “cut out” and “bake” cookies all day long.

il_570xN.683468892_sp4k

I also made a set with Christmas tree cookies. Same idea, different shape (and same unbeatable price)!


Advertisement

Felt Dr. Who Christmas Stocking

IMG_4786

The best kinds of custom orders are the ones that give you a topic you could run with. For this project, my friend asked if I could make something out of felt relating to Christmas and Dr. Who. So my first thought – a Tardis Christmas stocking!

The idea was solidified by a picture I saw on Pinterest. (It’s so hard to have an original idea these days.) But in the picture, it looked like everything was glued down, and I decided to sew everything in place instead. Plus, I added the touch of holly and a wreath to add to the Christmas theme.

It’s not a large stocking, but it’ll be perfect to hang at your desk, in a school locker or on a door handle. Send me a message via my contact page if you want to place a custom order for yourself!

Wish I had thought of it: Felt Baby Costume

As more and more crafty people join Instagram, I find that the mobile social media site has now surpassed Pinterest as a major source of inspiration. Example A:

IMG_4681

This. is. ADORABLE! Plus, it looks so easy to create. I imagine you can sew or use fabric glue to attach strips and squares of white felt to a yellow onesie. And it would be easy to make the headband with elastic and green felt.

Unfortunately, I do not have a kid of my own, but luckily my sister-in-law is due the first of March. This will be prefect for my new niece this time next year!

Check out more of A Beautiful Mess on Instagram here!

[Felt] Leaves are in the Air

Do you find it strange that fall is so colorful? I mean, not to get too philosophical, but even in the midst of the dying leaves, natures bursts forth a new color spectrum. God is pretty spectacular.

And those my felt leaves in no way compare to the real thing, they are still fun to make!

IMG_4634

My friend Melissa asked me to make a bunch of felt leaves she could use to create a wreath. She wanted a variety of shapes and colors, so I happily obliged. After cutting out the leaves (I did use stencils for some of them), I used thread to stitch in the veins. But since I knew she wanted to make a wreath, I didn’t care to cover up the back side.

IMG_4630

With the leaves, Melissa wrapped a foam ring with raffia and used a hot glue fun to attach the leaves. The finished product came together wonderfully! I love it so much, I feel like I need to make another one for myself!

IMG_4665

Valentine’s Day Cards with Felt Hearts

As you very well know, I love Valentine’s Day – probably because it gives me an excuse to make heart-shaped pillows, eat lots of chocolate and send out hand-written notes. And though the pun-filled Valentines one can find at Target are adorable, I decided to make my own stationary this year with items I had around my apartment, and I was able to do it in 3 easy steps.

20140213-144715.jpg

Step 1: Cut hearts out of pink and red felt. (I used pinking scissors when cutting out mine, but the beauty of these notes is that you can do whatever you want.)

20140213-144740.jpg

Step 2: Attached the felt to the notecard using a needle and some thread. (It is remarkably easy to sew through card stock!)

20140213-144729.jpg

Step 3: Write a heart-felt note, like…

Dear friend,

To echo the words of Paul, “I pray that you, being rooted and established in love, may have power, together with all the Lord’s holy people, to grasp how wide and long and high and deep is the love of Christ, and to know this love that surpasses knowledge—that you may be filled to the measure of all the fullness of God.” (Ephesians 3:17-19).

Happy Valentine’s Day!

Love, Sarah

Vintage-Inspired Felt Heart Pillow

IMG_3614

I’ve said it once, and I’ll say it again. Felt hearts are wonderful! And this pillow might be the cutest thing I have made in awhile. The vintage-patterned fabric (made up of tiny pink and red heart-shaped flowers) serves as the perfect compliment to a big, red heart!

IMG_3571

And to add an even sweeter touch, I used pink yarn to stitch a border of smaller hearts, attaching the felt to the fabric.

IMG_3621

I know I made these pillows in preparation for Valentine’s Day. But I’m already convinced I need these all year long. It’s currently on my Etsy shop, but if you want it, I would buy it fast. I might decided to keep it for myself.

Brown Paper Packages Tied Up with String

From January to November, I am all about using kraft paper for all of my gift wrapping needs. Add in a  cute ribbon, and I have a simple yet adorable package to give out for birthdays, weddings – you name it! But come December, and I can’t help but fall in love with the festive holiday options.

But since life after college has been all about being resourceful, I decided to not invest in the beautiful and very tempting sheets of holiday wrapping (I’m looking at you Paper Source), and instead, use the materials I already have: brown paper, paint and plenty of ribbons!

20131220-120517.jpg

Step 1: Wrap your gift. (Easy enough)

20131215-100604.jpg

Step 2: Paint your design. (My flowers are a mixture of white paint with touches grey and red and black centers.)

20131220-120506.jpg

Step 3: Tie it all up with a bow.

(Sadly, it appears that I got so into gift giving that I forgot to take pictures of this step and onward.) But just imagine it in mind – the beauty of a simple, wrapped gift.

An Apartment Christmas

I debated for a week whether I wanted to get a real Christmas tree. Pro – A Christmas tree is magical. Con – It’s a big set up for someone who’s going out of town for the holidays. Plus I would have to clean it up afterwards. In my mind, the cons outweighed the pros, so I did not get a Christmas tree this year. But that didn’t stop me from decorating elsewhere.

20131212-232329.jpg
My parents brought me my great grandmother’s chest of drawers to use as my TV stand (and craft supply storage), but for Christmas, I decided to let it display my felt ornaments I made last year.

20131212-232347.jpg
Who needs a tree! I think these ornaments look better here because they are easily displayed (and not stuck behind any branches). Maybe one Christmas I’ll invest in a real Christmas tree, but for now, I’ll be festive in other ways.

20131212-232428.jpg  20131212-232420.jpg

Holiday Yarn Pom Pom Garland

_DSC0182

As you know, I love a good pom pom made (See: Pom Pom Flowers), so when it came time to decorate for Christmas, I thought I would whip up an easy pom pom garland. And though I have already posted a tutorial, I figured it would a refresher wouldn’t hurt. And this time, instead of telling you, I thought I would show you!

Need it now? You can buy the garland on Etsy today for $15.50.

My heart’s on a string

IMG_2020

If you have been reading this blog from the beginning, you’ll notice that I have made this garland before (See the first one and a Valentine’s Day version). After living in my house for several months, I just couldn’t get over how plain our mantel looked. I wanted to bring it to life, so naturally, I thought to make this.

IMG_1996I used felt, polyester fill and some embroidery floss. I cut out the hearts by hand and then sewn two pieces together, leaving a hole to stuff it with filling. Once it had some shape, I sewed the hole closed. With six hearts made, I took the embroidery floss and stringed the hearts together.

IMG_2022Once it was complete, I tied the garland to nails on our mantel. The project took me less than an hour to make. (I actually made it impulsively when a friend called one afternoon and told me she was running an hour late.)