Sweet Honey Pillow

As the heat rises for the approaching summer, I couldn’t help but be inspired. I have been admiring quilts lately (with the goal of making one myself soon) and I stumbled across one made of hexagons. I instantly thought of honey bees, honey comb… and as you can see I got to work.

I measured and cut out my stencil (with a 1/2″ seam allowance) and gathered all the leftover yellow and orange fabric I had. And started cutting.

Once cut out, I laid out the pieces (I ended up having to add more pieces than pictured above) and I sewed together the columns.

I wish I took a better picture of this next step, but basically what I did was layer the columns on top of each other (after ironing a seam on all sides) with the 1st row behind, 2nd row in front, 3rd row behind, etc. and sewed them together

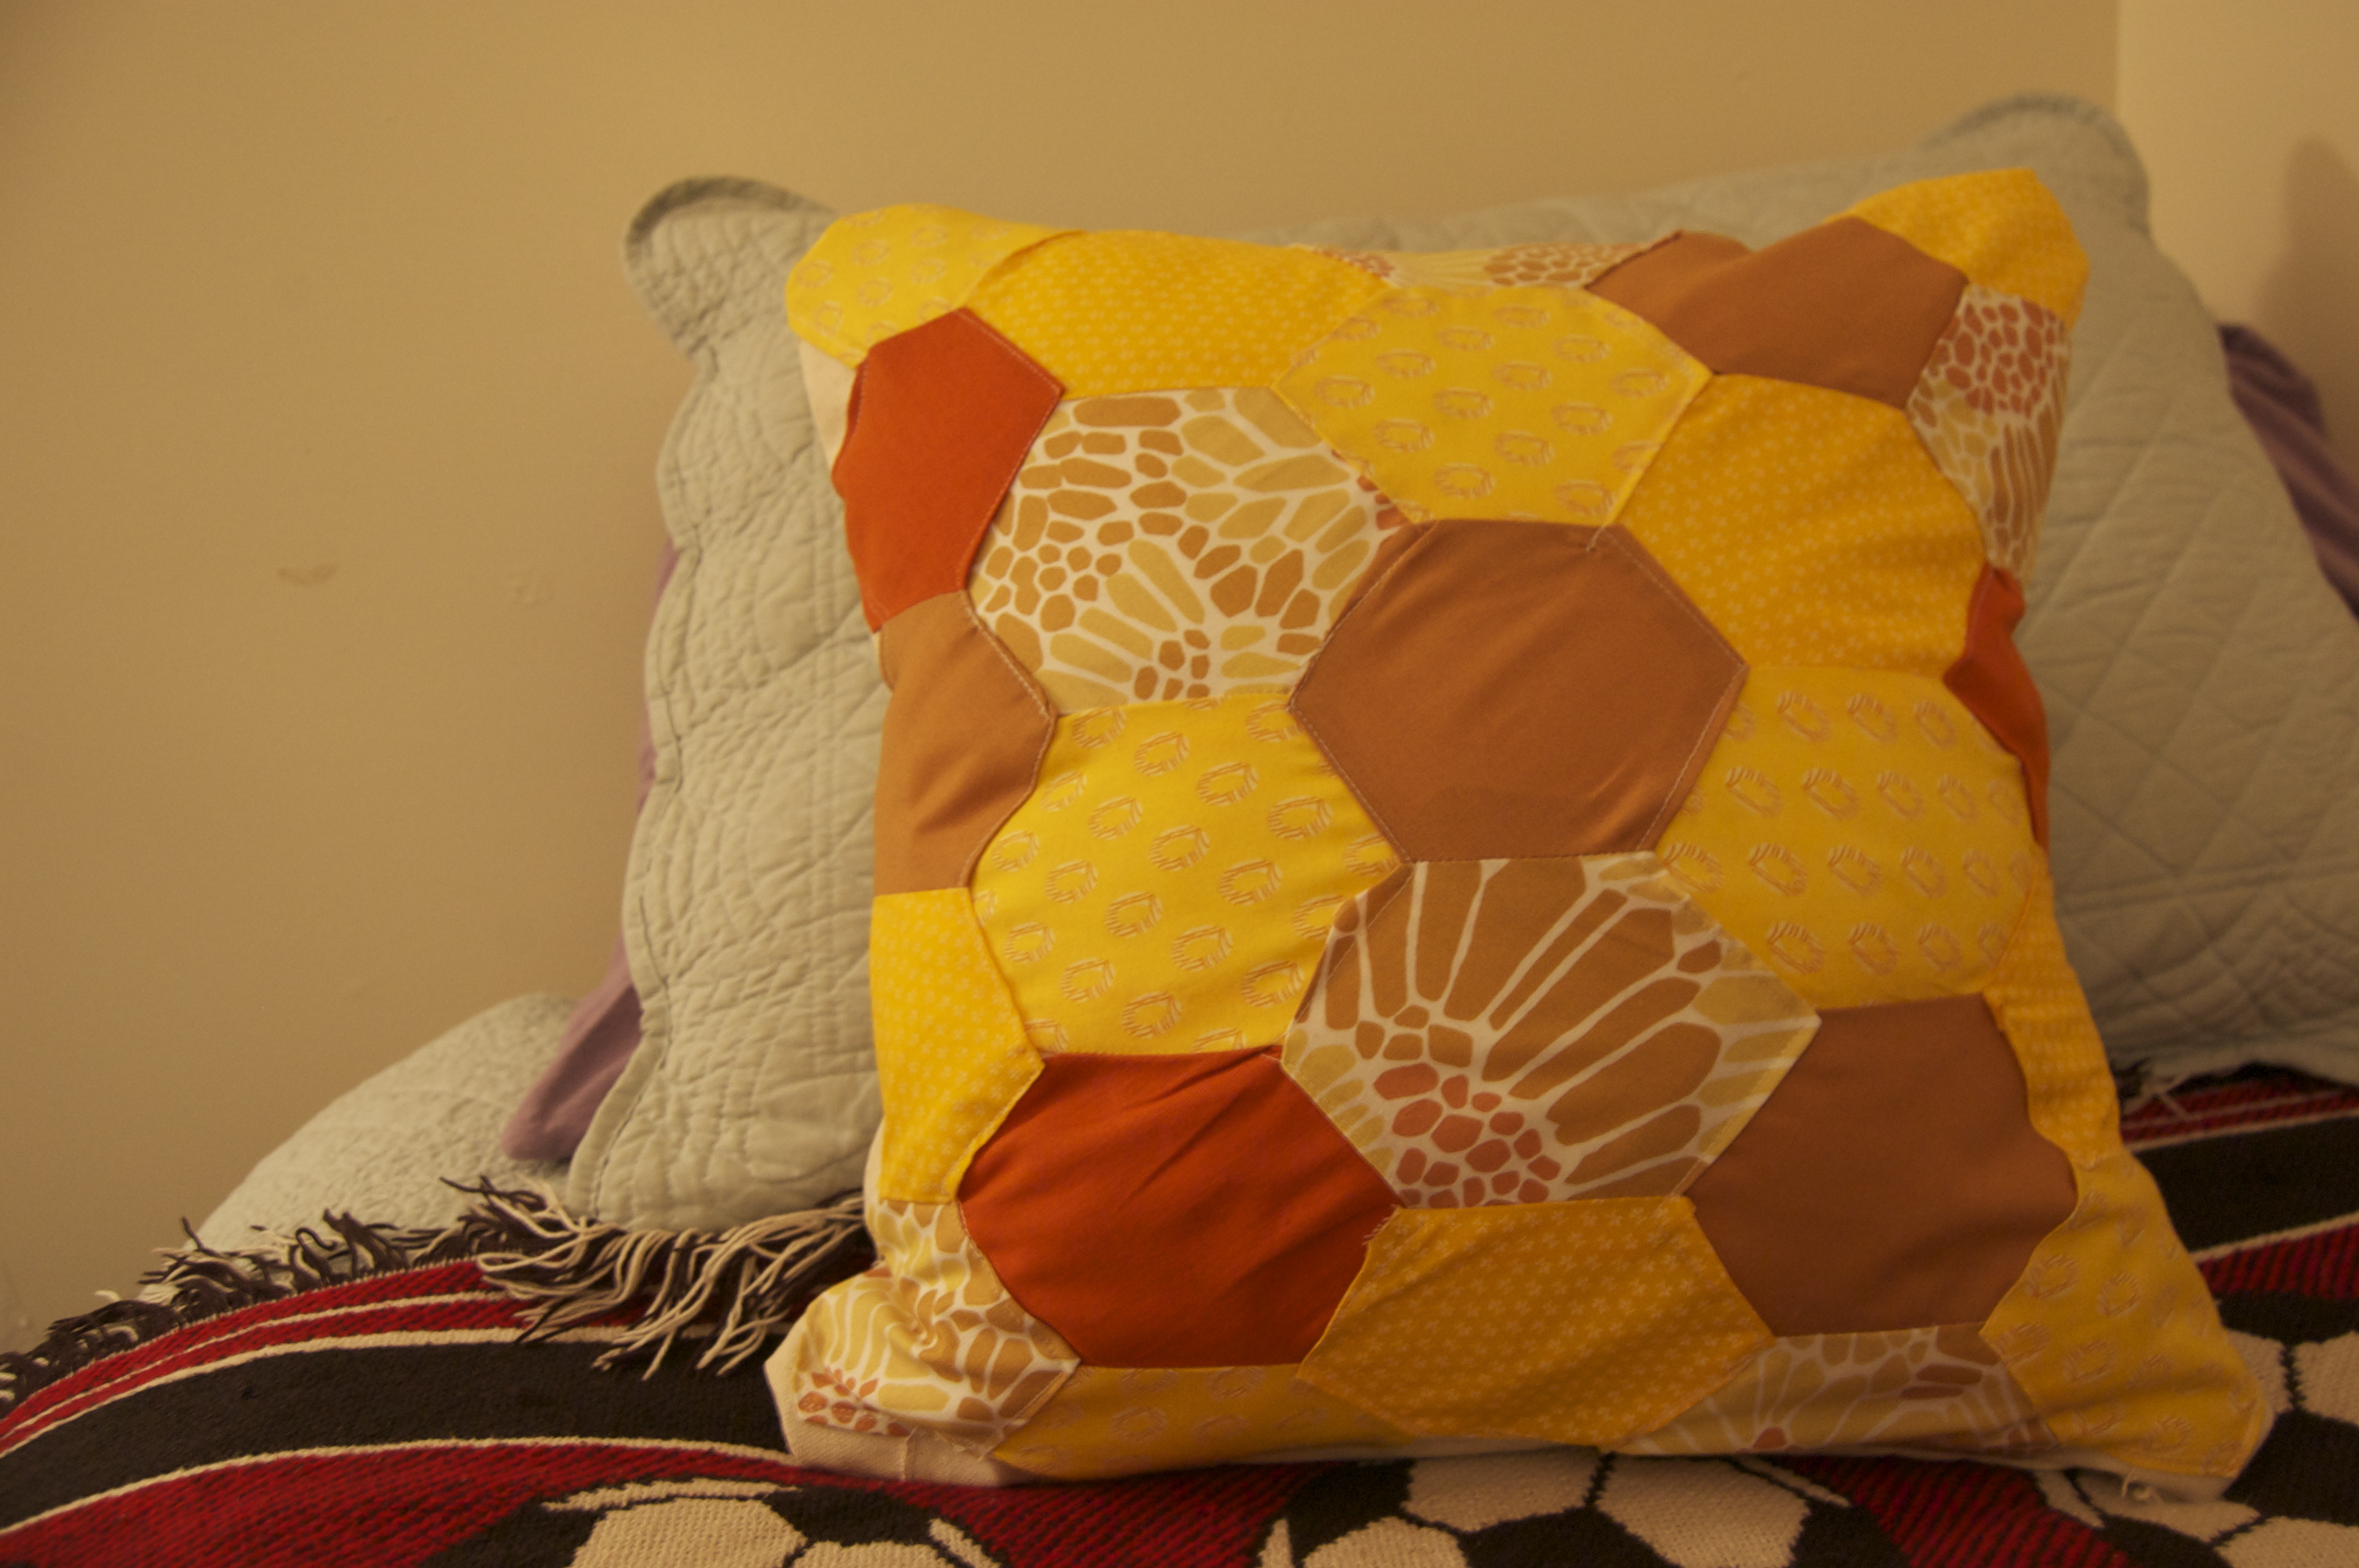
Once all the hexagons were sewed together it looked like this.

The square of hexagons weren’t enough to cover my 16×16 inch pillow form, so I took the canvas material I purchased for the back and four 2×17 inch long strips. These I pin together along the sides and then sewed along the hexagons’ edges to attach in place.

With that together, I started working on the back. Again for my 16×16 inch pillow form, I cut 2 12×17 inch rectangles to serve as my envelope back. And just in case people didn’t get the idea of honey bees from the front, I wanted to add a subtle hint by embroidering on some bees.

The final step was to sew it all together, with the right side always facing in. Simply layer the three pieces on top of each other and sew (with a 5/8 seam allowance) around all four edges. Cut off all the extra thread, flip it around, add the pillow form and pat yourself on the back for making a pretty adorable pillow!

Anthropologie Inspired Tablecloth

I don’t shop at Anthropologie often, because let’s face it, who can afford it? But goodness, do I love that store. My roommate one day pulled out a napkin from the store that someone gave her as a gift, and it sparked my inspiration – a tablecloth made up of cloth napkins. So I went online and found these. The napkins come in a set of 6 for only $32.

With the napkins, I wanted to make a table clothe. My game plan was simple – to sew together the 20×20 inch napkins into a large square and then cut out a circle. With only 6 napkins, I had to do some planning, but first I wanted to make sure I could use every inch of fabric. So I took out the hem, adding about an inch of fabric on each side.

Once I removed the hem, I needed to secure the edges so they wouldn’t continue to fray. This is how I discovered the overcasting stitch feature on my sewing machine (I know this is probably something really basic, but you’ll have to bear with me. I’m relatively new to a sewing machine.)

Once I had stitched over all the edges, I began to lay everything out. I needed to make a 50×50 inch square. So I kept 4 napkins whole and cut 2 napkins in half, placing those on the outer edge. If you notice, that leaves a 10×10 inch square missing, but I’ll come back to that later.

So I got to sewing each piece into place. The napkins’ corners were cut off, which caused a few hole to appear when sewing them all together. But I just decided to embrace the patchwork-ness of it all, and I simply hand sewed it together.

And then using the technique I learned on my last table cloth, I marked the fabric to cut out a circle.

I found this fabric rather difficult to measure and cut. And as you can see, I was unable to cut a perfect circle. But since this is inspired by Anthropologie, why not accept their homemade philosophy. It’s homemade; it doesn’t have to be perfect. (It just has to look adorable!)

Now, back to one of my original problem – the 10×10 inch missing square. Well once the circle was cut out, the missing piece was easy to fix. I simply took  a piece of the scraps leftover from cutting out the circle and patchworked it into place using a simple straight stitch.

For the finishing touch, I decided not to hem the tablecloth, but instead to use the overcasting stitch again. I liked how it makes the fabric look raw, like it’s a scrap piece from another project.

And that’s it. I’ve learned you don’t have to shell out a lot of money for Anthopologie products. You just have to buy the cheaper, simpler ones and make them into something extraordinary.

DIY: Throw pillow with Piping

Last week I ran into JoAnn Fabrics to buy something and found myself spending an hour in the store after I stumbled across this fabric. I finally decided that I wanted to make some pillows, so I purchased two 18×18 inch pillow form, a half yard of the floral fabric and a basic blue fabric to match, and cord to make the piping edge.

Before cutting the fabric, I made a game plan. For the 18X18 pillow, I planned to cut a 19×19 inch square (in the floral fabric) and then two 19×12 inch rectangles for the back (in the blue fabric). And then for the piping, I calculated I would need it to be 72″ long.

Making the piping edge was actually a lot easier than I thought it would be. I purchased the cheapest craft cord I could find. And for the fabric, I cut a long 2″ wide rectangle. I knew it had to be 72″ long, so with the scraps I had leftover I made two 36″ long rectangles.

I then folded the fabric over the chord, and using my zipper foot, I sewed the chord in place. Back to the fabric of the pillow, I took the the 19×19″ square and used a cup to round off the edges.

I did the same with the blue rectangles, but only on one of the long sides. The other long side I hemmed in place (about 1/2 inch).

Then it is time to assemble it all together. I ending up making two pillows. On the first pillow, I assembled each layer, pinned it down and sewed it all together. The second time, I sewed in parts, and it produced a much better pillow. So with the right (floral) side up, I pinned the piping in place (clean edge facing inwards). And I used the zipped foot again to sew in place.

Then I pinned down the two rectangle pieces, alining them with the rounded corners.

Sew it all together, flip it inside out and insert the pillow form – and you have yourself a pretty adorable throw pillow.

DIY: Tablecloth with Ruffle Edge

Have you ever fallen in love with a fabric?

I fell in love with this fabric one day walking through Hobby Lobby, and I literally spent 2 weeks thinking of something I could make out of it. It didn’t come across as a fabric for a skirt or a dress, so I thought beyond clothes. And the idea of a tablecloth finally became clear. So with some measurement and brainstorming, I headed to Hobby Lobby to buy my 3 1/2 yards of the wonderful fabric.

I assembled everything together in the common room of my dorm room. It was definitely a small space (all my cutting took place on the floor), but luckily I had everything I needed, even a dorm room sized ironing board.

Step 1 was measuring. I wanted to send this to my parents, so I had my dad measure the diameter of our patio table (42 inches) back home. And with 44 inch-wide fabric, I decided to cut the circle with that diameter (since I couldn’t get any bigger).

I used a technique to cut the circle from this website that I found when I was doing some pre-sewing research (see her first sketch). But basically, the technique is taking your fabric pencil and attaching it to a string that measures your radius – like a compass circle. After marking, I simply made the cut.

With the top done, step 1 is complete, and it’s time to more on to the ruffled skirt.

And we start step 2 like step 1 with lots of measuring. I measured two long panels 10 inches high and 3 1/2 yards long. After cutting them out, I sewed the two panels together, making a one 5 yard long panel and began pinning the rik rac on the fabric. I placed the rik rac 2 1/2 inches above the unhemmed edge.

In Step 3, we sew on the rik rac. After pinning it down, I simply ran a straight stitch right down the middle of the ribbon. Then I took the time to go back and sew in the zig-zagged pattern, making sure the edges were securely sewed down.

Then I changed the settings of my sewing machine to allow for a looser and longer stitch. With this, I sewed along the upper part of the fabric, not sewing backwards to secure the ends. Then, taking only one string on the end, I gently pulled on the string to gather the fabric. Continually spreading out the fabric and pulling the string to gather the fabric, a nice ruffled effect is created.

And then with right sides together (ignore the left picture above, it is wrong) pin the ruffled skirt to the circled top. With everything in place, sit yourself down at a sewing machine and sew – using the standard 5/8 seam allowance.

The final step is to sew a hem for the skirt (the easiest part) and iron out all the wrinkles. And ta da! You have yourself a beautiful, spring tablecloth.

Note: I did make this for a 42″ round table and the one picture above is on a 35″ one, but I kind of liked how it looks here. (I’m thinking I might have to make another one!)

DIY: Cloth Napkins

What’s fancier than having a cloth napkin? Think about it, have you ever been to a nice restaurant that sets the table with paper napkins and plastic silverware? No, of course not. So I have decided that even though the college lifestyle has been defined by paper plates and plastic cups in the past, we are a generation with more of a refined taste. (Or we should try to be at least).

On a college budget, purchasing these napkins could be a little pricing (depending on where you go), so of course, I highly suggest the option of making them for yourself.

I chose to make 16″ squares for my napkins, so with the patterned fabric, I measured and cut a 17″ square. Then with the solid fabric, I measured and cut a 16″ square. I laid out the two fabrics with the patterned side on the bottom and wrong sides together.

I then took an iron and pressed up the sides of the patterned fabric, pinning the fabric in place for the moment.

Once sitting down at the sewing machine, I folded the edge under again so the frayed edges was not visible. Then I simply straight stitched the edge.

It’s as simple as that. Now nothing is stopping you from living a life free of paper napkins and plastic forks!

Note: I used 1.5 yards of each fabric to create 5 napkins.

For your Sweetheart: A Valentine’s Garland

I simply adore Valentine’s Day! Not for the romantic element, but for the fact that it is socially acceptable to go over the top with heart-inspired decorations. This project is the first dorm room project of the spring semester, and I am completely obsessed with it!

I gathered my supplies – red, pink and white fleece squares (I know, I’m usually all about felt, but I thought the fleece had softer colors), embroidery floss, some leftover quilt backing and a heart stencil I cut out myself.

The whole thing is pretty simple. I first cut out the backing using the paper stencil I made. Then using the backing, I cut out the fleece, making the hearts slightly larger.

Once the hearts were cut out, I used the floss to embroider on the cute saying one would find in a Sweetheart candy box. I stuck to the more classic sayings. Though I did find one on google images that said “Tweet Me,” I held back and stuck with the ones I could remember from my childhood. “U R GR8” might be my favorite!

After that, I placed the backing inside the hearts. I chose to use yarn as my string that would holds the garland together, and once everything was in place, I pinned it all together.

And as you can see, the sewing machine was pulled out to stitch it all in place. The final result is simply adorable, and adds an element of cuteness that our common room needed.

I’m Seeing Green: Indie Ladies Step Sing

The longest running Samford tradition is in full swing, and it would be an understatement to say that Step Sing is sort-of taking over my life. I will admit the crafting has not been very active, but I’m hoping after today’s trip to Hobby Lobby, things will turn around. (Now I’ll just need to find some spare time.)

In the midst of the craziness, I have been doing projects here and there, but of course, they are all Step Sing related. And being in the Independent Ladies’ show, everything is looking green (aka our official color).

First project – I volunteered to decorate our show’s bucket we use to collect donations for the show’s charity. And of course, with limited time and a limited budget, I fell back on good ol’ felt.

I created stencils out of basic printing paper before cutting the felt. And then, to give the letters a little sparkle, I used glittery, green felt as the background. (Note – I usually despise glitter (it gets everywhere), but I really wanted the letters to pop! So I guess the sacrifice was worth it).

Once the letters were done, I glued them onto the bucket that was already adorned with camo felt. The one problem I did not anticipate was the size of the letters. If I could do this again, I would most definitely make the letters smaller so you could read the whole thing without having to spin the bucket, but oh well. It’s done and I think it turned out cute.

Project #2: Indie Ladies flag

I literally made this flag in 30 minutes, so I wasn’t surprised that after two waves, the white fabric began to fray. But the important thing is that it’s green and it boldly displays our letters. I bought an American flag at Walmart, and after gently removing the flag, I used the stick for my own.

And finally: Encouragement baskets for a few of the other shows.

And yes, I did make a special trip to Publix to purchase green bags. What can I say, I’ve been seeing green more and more everyday. If you are in the Birmingham area next weekend (Feb. 10-12), you should definitely try to catch a Samford Step Sing show. It’s going to be amazing!

DIY: Apron

Sewing project #2 – The Apron

My grandmother told me that the first thing she ever made on her sewing machine was an apron, and fully appreciating her wisdom and experience, I decided to give it a shot after finishing the skirt (plus I had a friend who loves aprons and had a birthday coming up – win, win!).

So I gathered supplies and went to work. And let me tell you, if you need a confidence booster in your sewing skills, aprons are the way to go. Following the pattern was stress-free. I mean, it’s an apron, it would be pretty hard to not make it fit.

A technique I picked up during the experience was gathering. It was the first time I really played around with the settings on my sewing machine (remember this is only my second major project). I basically set the stitch length as long as it would allow and then I decreased the tension by 1. Once sewn, I carefully pulled on one of the strings until the whole line looked “gathered.”

The only issue I had was with the fabric. In the fabric store, my parents and I went back and forth about what color the dot was in the blue, patterned fabric. We decided it looked orange, and I purchased the orange fabric to compliment it. The problem was I came home and under natural light the dot was definitely red. I freaked out for maybe a minute, but then I just had to let it all go. I had already bought the fabric, and there was no turning back. So I continued on, and now with the finished product, the orange fabric makes the dots look more orange.

Oh and did I mentioned I sewed in a pocket, plus I lined it – for the win!


For a cozier passport

You really can make anything out of felt. My sister-in-law’s birthday was this week, and my parents knew they wanted to give her money but they wanted to add little something to go with it. That’s when the idea for a felt passport holder popped in my head. Now, if I could make it again, I would make some changes, but for a project that took me a few hours to make, I was super happy with the results.

I took my passport and a leather passport holder that I already owned as a stencil. I used a disappearing ink pen for dark fabrics to make the outline.

Though I took this picture right before I sewed it all together, it shows the steps that led me up to this point. I cut out fabric for the left and right sleeves. Then I top stitched the edges. (Plus I added a little personalized touch with an embroidered name.)

I used felt to cut out the tree, and I simply hand sewed it down. For the flowers, I cut out a little felt circle then embroidered a dot at the center at each one.

After pinning everything in place, I sewed everything together. It didn’t turn out perfect, but I like that it looked obviously homemade.

I Made a Skirt!

Guess who can make her own clothes? That’s right, this girl! But after  2 days of sewing, I’m pretty solid in the thinking that I will continue to buy my clothes from here on out.

Don’t get me wrong, I am super pumped that I made a skirt for myself, but the facts are that (1) it’s not perfect like something you would buy at a store and (2) it was a pretty frustrating endeavor to undertake.

My biggest issue was all the instructions. They were confusing and I had to look up several terms online, and even then I was still confused. Thank the Lord for the Internet, though. I would not have been able to install a zipper without this website and its pictures

I used the pattern: Simplicity 2410 (Simplicity being the company's name).

And my work is not technically done. This morning, as I pulled on the finished garment, I couldn’t help but notice that it’s probably 2 sizes too big. So I’ll be exploring the art of alterations tomorrow, but oh well, I rather it be too big than too small.

Overall, the experience was pretty good. And if you’ve never tried sewing together a clothing pattern, I definitely think you should try it at least once. (I’m hoping that like most things, it simply gets easier with experience.) And as the over-achiever that I am, I’ve already picked out another pattern to sew… hopefully it will be as easy as the lady at JoAnn Fabrics advertised it as!