A [Felt] Breakfast of Champions

DSC_0087

When my sister-in-law told me that my 19-month-old nephew loved to “cook,” I figured I could chip in a few ingredients. And while Ikea has supplied him with my the basic fruits and vegetables, I thought I would provide a whole meal: felt fried eggs, felt bacon and a stack of felt pancakes.

DSC_0081

The easiest of the 3 items is the felt fried eggs because you really can’t go wrong. I used two pieces of the white felt (cut in any shape) and one circle of yellow felt for the yoke. Once I attached the yoke to one piece of the white felt, I blanket stitched the two pieces of white felt together (using two pieces hides the back stitch from the attaching the yoke and it adds some thickness).

DSC_0083

I created the felt bacon strips next. Again, using two pieces of brown felt to add thickness. I added the line of “fat” using light brown felt.

DSC_0079

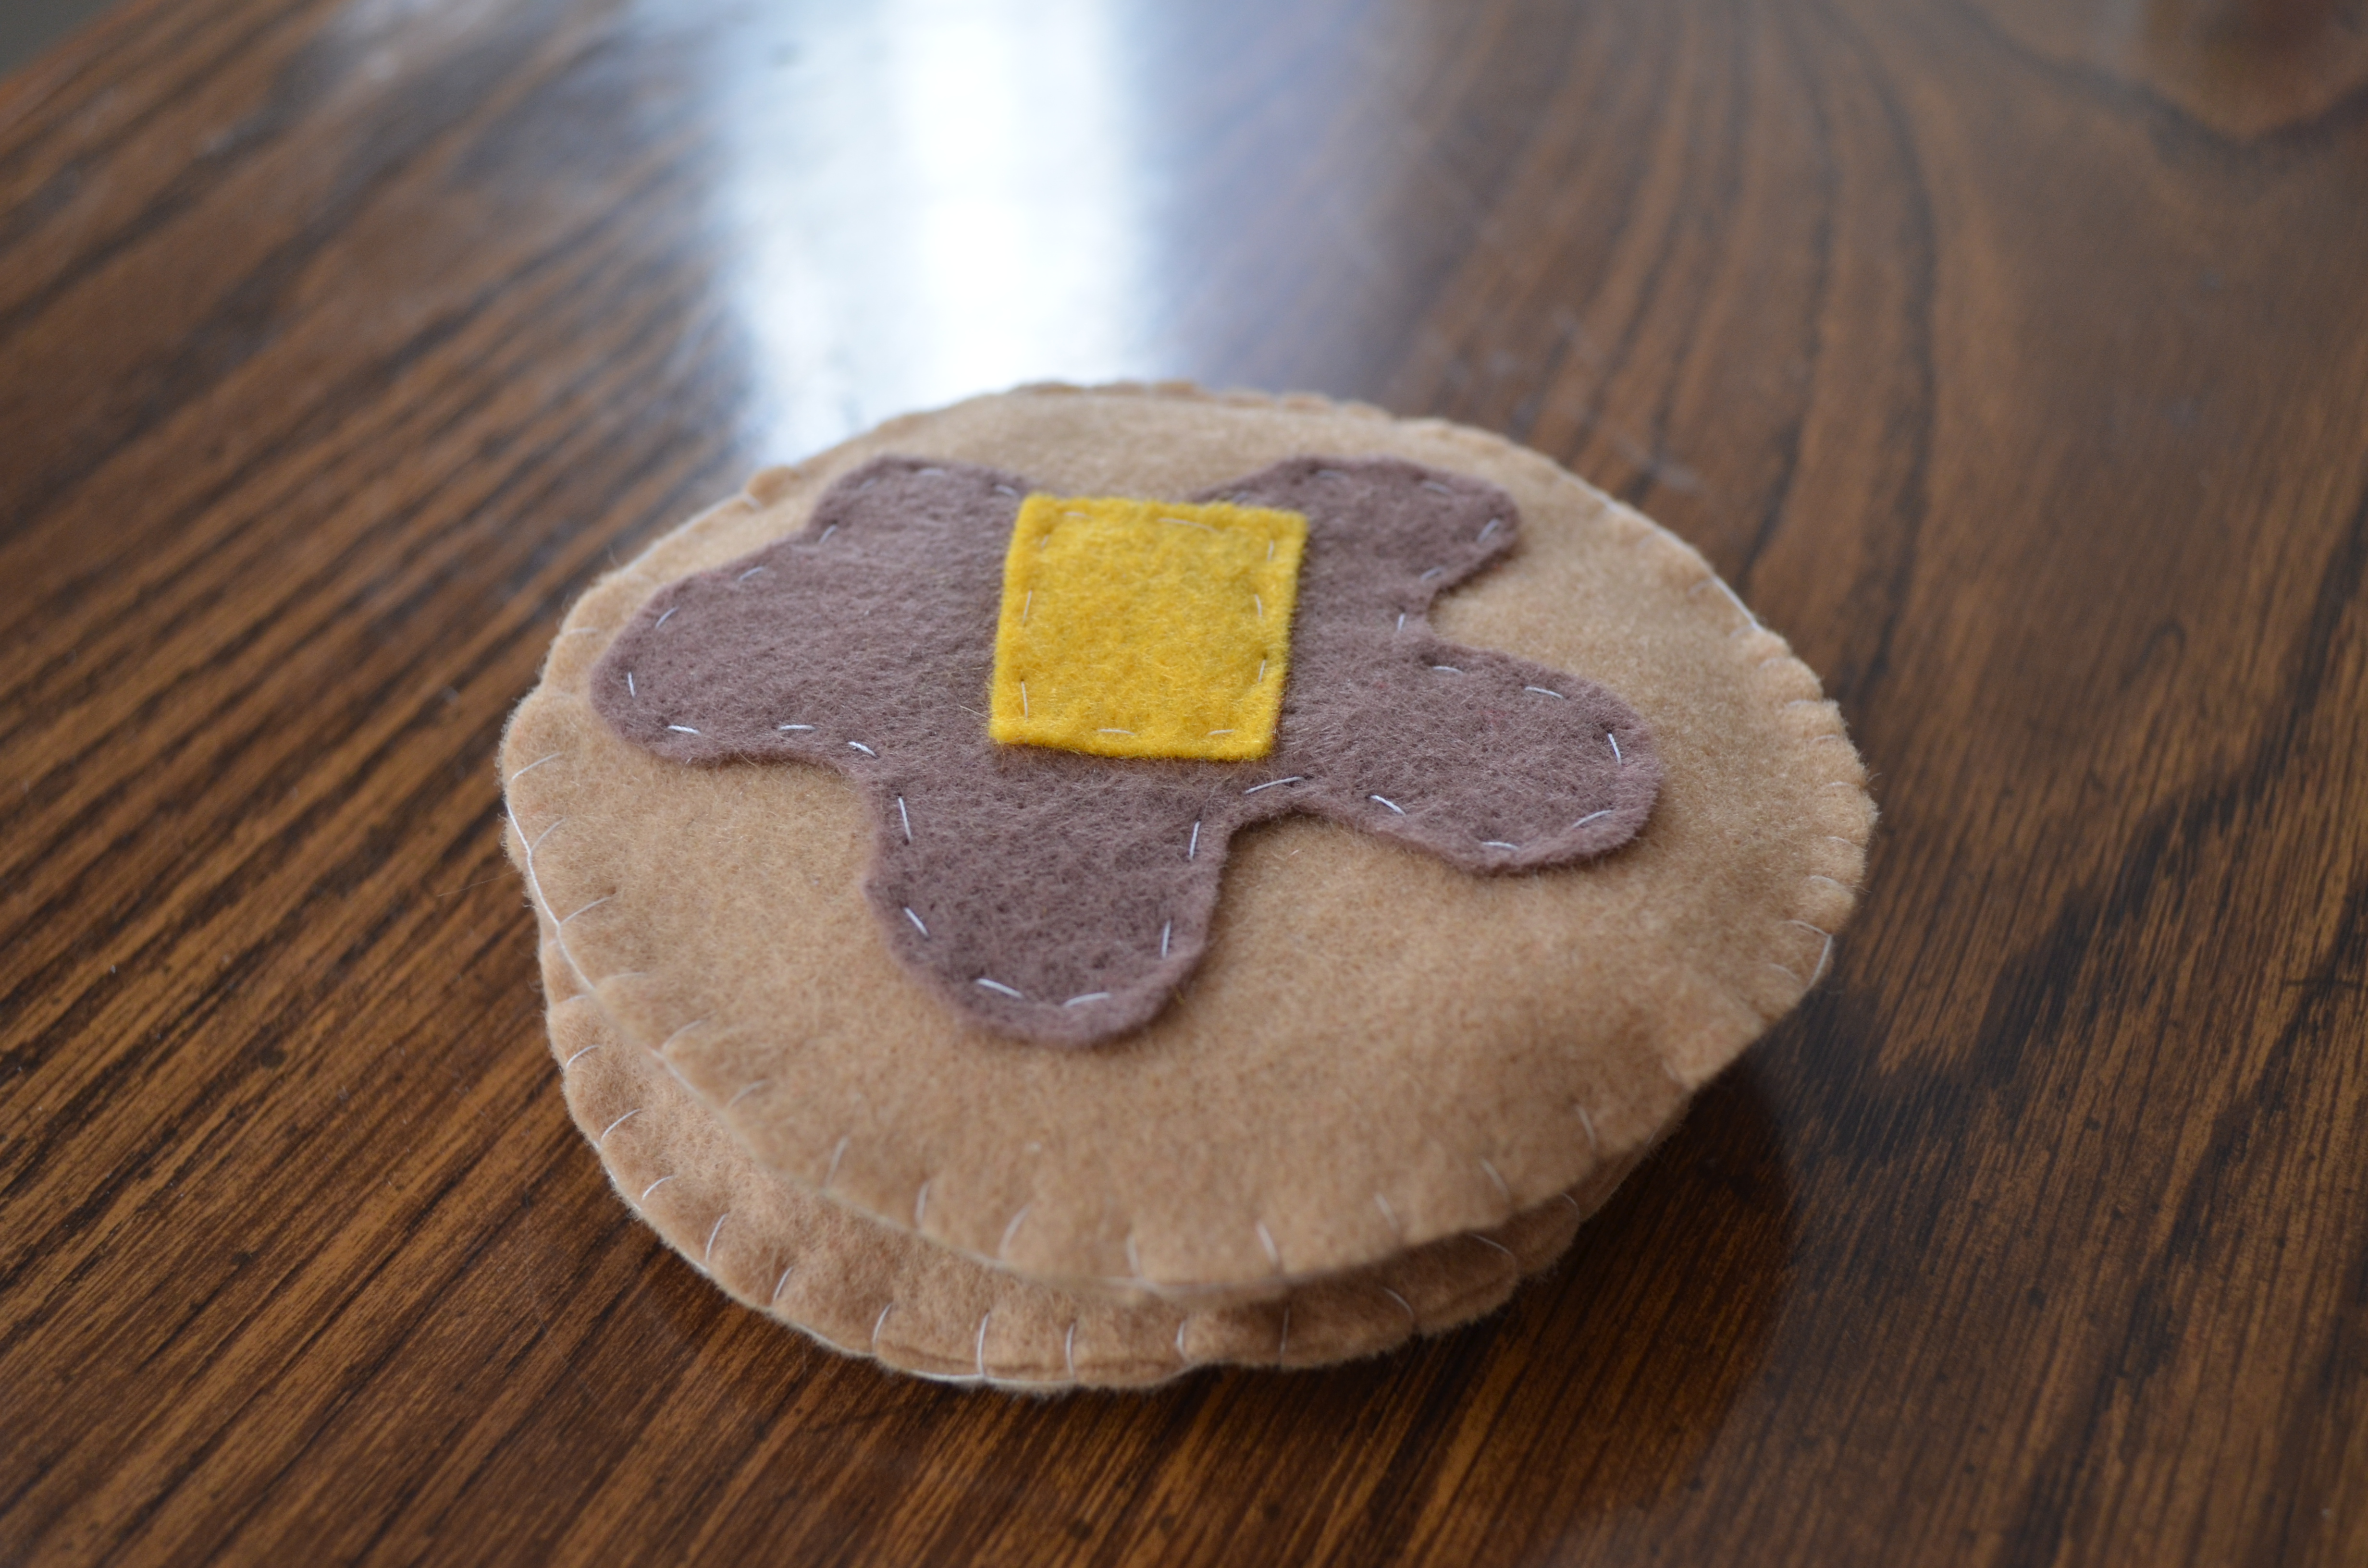
For the felt pancakes, I cut two circles of light brown felt as well as “syrup” with dark brown felt and “butter” with yellow felt. I attached the “syrup” and “butter” to one of the circles, and then using a blanket stitch, I attached the second circle, leaving a small hole to stuff the pancakes with batting before sewing it closed.

I don’t know what what could be more adorable. Well, then there’s lunch…

Advertisement

Vintage-Inspired Felt Heart Pillow

IMG_3614

I’ve said it once, and I’ll say it again. Felt hearts are wonderful! And this pillow might be the cutest thing I have made in awhile. The vintage-patterned fabric (made up of tiny pink and red heart-shaped flowers) serves as the perfect compliment to a big, red heart!

IMG_3571

And to add an even sweeter touch, I used pink yarn to stitch a border of smaller hearts, attaching the felt to the fabric.

IMG_3621

I know I made these pillows in preparation for Valentine’s Day. But I’m already convinced I need these all year long. It’s currently on my Etsy shop, but if you want it, I would buy it fast. I might decided to keep it for myself.

Embroidery on a Snow Day in Alabama

When I walked into my apartment after a rather insane day of snow and ice in Alabama, I put on comfortable clothes, made some tea and pulled out the embroidery floss. My snow day was going to be a relaxing one.

DSC_0543

“Come Thou Fount” might be my favorite song of all time. After finding this fabric amongst my scraps, this verse instantly came to mind.

DSC_0550

Since I used a smaller hoop (only 6 inches in diameter), I have to use smaller text to make it all fit. I made “Hello Friend” a couple of months ago and decided to mimic its font for this hoop.

DSC_0551

The finish touch to all this is a piece of felt to cover the back. I added the heart just because I wanted to, but I’m thinking it might be a nice signature touch for all of my future projects. Maybe it could turn into some sort of logo.

DSC_0545

My Love Letter to Paper Source

Birmingham has seen so much growth since I moved here in 2009 – new music venues, restaurants and a baseball stadium. But if I were to list my top five favorite businesses that have moved to the Magic City in the past 4 years, Paper Source is definitely one them.

20131213-192930.jpg
Why do I love this place? Not only do they have a wonderful selection of cards and stationary, but they also sell sheets of wrapping paper that I use as posters. For less than $5 a sheet, they make for easy decor (seen here in my bedroom).

20131213-192140.jpg
20131213-192120.jpg
Now Paper Source is not paying for me to write this post, but if anyone from the company is reading this, I would happily endorse you more in return for gift cards and stationary!

Something Beautiful

When I lived in Washington D.C. last summer, I would wander the halls of the National Museum of Art and feel envious of the painters who were allowed to spend hours recreating the masterpieces that hung on its walls. On certain lazy Sundays, I like to take up the practice of mimicking another’s work. Though it may sound strange, I find the practice rather relaxing, but truly, studying the stroke and technique of another painter is the best way to grow as a painter yourself. Today, I decided to bask in the art of flowers (ones first created by Erin Gregory).

IMG_2924

Quilting with Moroccan Fabric

IMG_2475

Having traveled to the cold land of the hot sun –  aka Moracco – twice now, I have found myself with several meters of fabric that are calling to be used. On my second trip to North Africa, I purposely bought a meter of a different color of the same fabric with the idea of making a quilt. With such beautiful fabric, I wanted to keep the quilt simple, so I mapped out a basic square pattern – one that could easily be used to make a t-shirt quilt.

IMG_2812

You can see the dimensions I worked with in the picture above. The squares were 11.5 x 11.5 inches, and I used a 0.5 inch seam allowance.

IMG_2509

Since I was working with woven fabric, I prevented frayed edges by using the basic zigzag stitch to act like an overlocking stitch. It  was a tedious process, but completely necessary. Fabric can still fray even after you stitch the pieces together.

IMG_2801

Once I finished the edges, it was a quick process to sew all of the individual squares into the rows and then the rows into a quilt. Again, I used a 0.5 inch seam allowance throughout.

IMG_2807

With the middle squares in place, I used a off-white canvas fabric to act as a margin of color – another simple touch to highlight the beauty of the fabric. The strips were 7 inches wide. I used the canvas fabric to match the thickness of the Morroccan fabric, but for the back fabric and binding, I used cotton. To see how I bind quilts, you can visit my previous post on the matter.

_DSC0061

I couldn’t be more happy with the finished product. It achieved the goal that I wanted – something that could show off the beautiful, hand-woven fabric as well as encapsulate my memories of purchasing the fabric on my travels. You just can’t find fabric like this here in America – well, as least not for the price that I paid for them.

_DSC0064

I found the fabric for the back side of the quilt at Handcock Fabrics, and it worked perfectly.  For the back side, I think the fabric needs to be simple enough to not trump the front, but interesting enough to add to the overall look of the quilt. This fabric did just that.

_DSC0073

This pattern is easy and simple to recreate since pieces are large, and you work with straight lines. Please feel free to ask any questions you have; I would love to help you as you work to create a quilt for yourself.

Growing Carrots in a 5-Gallon Bucket


Since I graduated from college three weeks ago, my new roommate says I have taken on a new obsession to help with the transition: gardening. (A little bit of dirt is good for the soul.) A few years ago, I heard of a neighbor growing carrots in a 5-gallon bucket, and finally, I decided to try it out for myself.
IMG_2711

This project began at my parent’s house (because they have tools and I do not). First step was buying the list below:

  • 5-gallon bucket (The Home Depot had them on sale at the end of each aisle. A bucket cost about $2)
  • A bag of rocks
  • Potting soil
  • Carrot seeds 

I also needed things I found in at my parent’s house

  • Hammer
  • Screw driver

IMG_2712

Before I can pour in the dirt, I prepared the bucket by poking holes in the bottom using a hammer and screwdriver. I found that the holes I made near the center of the bucket caused cracks (which I did not want). So, just beware that can happen. IMG_2713

With holes finished, I put a 3-inch layer of rocks at the bottom of the bucket. I purchased river pebbles, but if I was to do it again, I probably would have used larger rocks.
IMG_2714

Next, I filled the bucket up with dirt. IMG_2715

I read online that carrot seeds should be sown in about 1-inch deep of dirt. And that I could sew a good amount of seeds (like 40-60). So I did. (This is the point of the project where you should know that I am 100% a novice gardener. I can tell you what I did, but I do not know if this is correct.)IMG_2718

But with that being said, after a week of being in full-sun and being watered everyday, I had sprouts! I am not sure how long this growing process will take, but I will need you updated. The lesson to be learned – If I can do it, so can you!IMG_2791

Exact dimensions

In the midst of stressful times, painting is good for the soul. My roommate laughed at me because she came home the other day and found me painting in bed. I figured when I was painting something so simple (see above), I couldn’t get too messy.

I found the idea from a letterpress print I found online. I didn’t copy the print exactly (that would be rude), but I did take the idea (and the bridge, canoe, feather, ruler and whale). Check out the letterpress shop here. It is one of my favorites, and it’s a great place to look for Christmas presents (hint, hint).

His Grace


Anthopologie sends catalogs to my parent’s house, and every time I come home, I have a nice little stack sitting on my bed. Perfect for a little collage.

Confession – I found this on Pinterest, and it just looked too easy to not recreate it. The whole thing says, “If His Grace is an Ocean, we are all Sinking.” This Anthopologie catalog used beach/desert scenery, which worked perfectly. I cut out the words Grace, Ocean and Sinking, using a similar color scheme for each word.

I used ModPodge to glue the letters to the canvas. When them in place, I simply used a paint pen to write in the other words. Even though I ended up selling this one at the Spring Fling Flea Market, I think I’m going to make another one for myself.

Sweet Dandelions

When it came time to start thinking about things to make for Samford’s Spring Fling Flea Market, these pom-pom yarn flowers were the first thing I thought of. One, they are incredibly easy to make. Two, the materials are super cute. And three, the are simply adorable. I only sold them for 50 cents, and since so many people asked me how to make them, I decided to provide a little tutorial.

Step one – pick out the yarn. For this project, you are going to waste a good amount of it, so make sure to pick the cheapest yarn available. Pick any color. To my surprise, the navy flowers sold out faster than the others. I figured the light purple would go first, but I was proven wrong.


Step two: Take the yarn and start wrapping it around two of your figures. You’ll need to do this maybe 120 times. Then cut a spare piece of yarn.


Step three: String the yarn through the ball and tie a knot (double knot it, just in case). Make sure the knot is tight. If not, all the yarn will fall out.


Step four:  Cut through the yarn on the opposite side of the knot. This will result in a crazy-looking pom pom. You’ll have to cut a lot of yarn off before it starts to resemble the finished product.

Finished, it should look like this. Once you have mastered this, you really can make so many things. I have seen them placed on wreaths, made into garlands or like mine, turned into my version of a crafty dandelion. To make the little flowers, I purchased some cloth stem wire.


Last step: I cut the wire in half, placed one end in the pom pom and used a glue gun to make sure it will stay in place.

I love how sweet they turn out. And once you get them down, you can make 3 in 5 minutes. Super easy and super fast.